


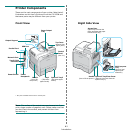

Setting Up Your Printer
2.
8
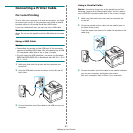
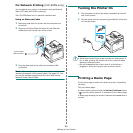
For Network Printing (CLP-650N only)
You can attach your printer to a network using an Ethernet
cable (UTP cable with RJ.45 connector).
The CLP-650N has a built-in network interface card.
Using an Ethernet Cable
1
Make sure that both the printer and the computer are
turned off.
2
Plug one end of the Ethernet cable into the Ethernet
network port on the left rear of the printer.
3
Plug the other end of the cable into a network LAN
connection.
NOTE
: After connecting the printer, you need to configure the
network parameters on the control panel. See page 8.1. You
can use the software supplied with the card. Refer to the
Network Printer User’s Guide.
To the network
LAN connection
Turning the Printer On
1
Plug the power cord into the power receptacle on the left
rear of the printer.
2
Plug the other end into a properly grounded AC outlet and
turn on the power.
CAUTION
:
• Some parts inside of the printer may be hot when power is
on, or after printing. Be careful not to burn yourself when
working inside the printer.
• Do not disassemble the printer when it is turned on or
plugged in. Doing so may give you an electric shock.
Printing a Demo Page
Print a demo page to make sure that the printer is operating
correctly.
To print a demo page:
In ready mode, press and hold the
On Line/Continue
button
( ) on the control panel for 2 seconds to print a demo page.
A demo page showing the printer’s features and capabilities is
printed.