


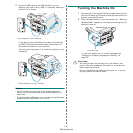
Getting Started
2.10
Setting the Date and Time
(Only for SCX-4521F/ SCX-4521FR)
When you turn your machine on for the first time, the display
prompts you to enter the current date and time. After entering,
it will not appear anymore.
N
OTE
: When turning on the machine after turning it off for a
long time, you need to reset date and time.
1
Press
Menu
until “Machine Setup” appears on the top line
of the display.
2
Press the scroll button ( or ) to display “Date & Time”
on the bottom line and press
Enter
.
3
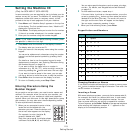
Enter the correct time and date using the number keypad.
Month = 01 ~ 12
Day = 01 ~ 31
Year = requires four digits
Hour = 01 ~ 12 (12-hour mode)
00 ~ 23 (24-hour mode)
Minute = 00 ~ 59
N
OTE
: The date format may differ from country to country.
You can also use the scroll button ( or ) to move the
cursor under the digit you want to correct and enter a new
number.
4
To select “AM
”
or “PM
”
for 12-hour format, press the or
button or any number button.
When the cursor is not under the AM or PM indicator,
pressing the or button immediately moves the
cursor to the indicator.
You can change the clock mode to 24-hour format (e.g.
01:00 PM as 13:00). For details, see “Changing the Clock
Mode” on page 2.10.
5
Press
Enter
when the time and date on the display is
correct.
6
To return to Standby mode, press
Stop/Clear
.
Changing the Clock Mode
You can set your machine to display the current time using
either a 12-hour or 24-hour format.
1
Press
Menu
until “Machine Setup” appears on the top line
of the display.
2
Press the scroll button ( or ) until you see “Clock Mode”
on the bottom line and press
Enter
.
The clock mode currently set for the machine displays.
3
Press the scroll button ( or ) to select the other mode
and then press
Enter
to save the selection.
4
To return to Standby mode, press
Stop/Clear
.
Setting the Paper Size and Type
After loading paper in the tray, you need to set the paper size
and type using the control panel buttons. These settings will
apply to copy and fax modes. For PC-printing, you need to
select the paper size and type in the application program you
use on your PC.
1
Press
Menu
.
The display shows “Paper Setting” on the top line of the
display.
2
Press the scroll button ( or )
to display “Paper Size” on
the bottom line and press
Enter
to access the menu item.
3
Use
the scroll button ( or )
to find the paper size you
are using and press
Enter
to save it.
4
Press the button to scroll to “Paper Type” and press
Enter
to access the menu item.
5
Use
the scroll button ( or )
to find the paper type you
are using and press
Enter
to save it.
6
To return to Standby mode, press
Stop/Clear
.