Troubleshooting
9.12
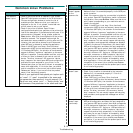
Common Linux Problems
Problem Possible Cause and Solution
The machine
doesn’t print.
• Check if the printer driver is installed in your system.
Open MFP configurator and switch to the Printers tab in
Printers configuration window to look at the list of
available printers. Make sure that your machine is
displayed on the list. If not, please, invoke Add new
printer wizard to set up your device.
• Check if the printer is started. Open Printers
configuration and select your machine on the printers list.
Look at the description in the Selected printer pane. If its
status contains “(stopped)” string, please, press the
Start
button. After that normal operation of the printer
should be restored. The "stopped" status might be
activated when some problems in printing occurred. For
instance, this could be an attempt to print document
when MFP port is claimed by a scanning application.
• Check if the MFP port is not busy. Since functional
components of MFP (printer and scanner) share the same
I/O interface (MFP port), the situation of simultaneous
access of different “consumer” application to the same
MFP port is possible. To avoid possible conflicts, only one
of them at a time is allowed to gain control over the
device. The other “consumer” will encounter “device
busy” response. You should open MFP ports configuration
and select the port assigned to your printer. In the
Selected port pane you can see if the port is occupied by
some other application. If this is the case, you should
wait for completion of the current job or should press
Release port button, if you are sure that the present
owner is not functioning properly.
Check if your application has special print option such
as “-oraw”. If “-oraw” is specified in the command
line parameter then remove it to print properly. For
Gimp front-end, select “print” -> “Setup printer” and
edit command line parameter in the command item.
The machine
doesn’t appear
on the
scanners list.
• Check if your machine is attached to your computer.
Make sure that it is connected properly via the USB port
and is turned on.
• Check if the scanner driver for you machine is installed in
your system. Open MFP Configurator, switch to Scanners
configuration, then press
Drivers
. Make sure that driver
with a name corresponding to your machine's name is
listed in the window.
• Check if the MFP port is not busy. Since functional
components of MFP (printer and scanner) share the same
I/O interface (MFP port), the situation of simultaneous
access of different “consumer” application to the same
MFP port is possible. To avoid possible conflicts, only one
of them at a time is allowed to gain control over the
device. The other “consumer” will encounter “device
busy” response. This can usually happen while starting
scan procedure, and appropriate message box displays.
To identify the source of the problem, you should open
MFP ports configuration and select the port assigned to
your scanner. MFP port's symbol /dev/mfp0 corresponds
to LP:0 designation displayed in the scanners’ options, /
dev/mfp1 relates to LP:1 and so on. USB ports start at /
dev/mfp4, so scanner on USB:0 relates to /dev/mfp4
respectively and so forth sequentially. In the Selected
port pane you can see if the port is occupied by some
other application. If this is the case, you should wait for
completion of the current job or should press Release
port button, if you are sure that the present port's owner
is not functioning properly.
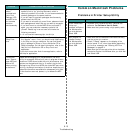
The machine
doesn’t scan.
• Check if a document is loaded into the machine.
• Check if your machine is connected to the computer.
Make sure if it is connected properly if I/O error is
reported while scanning.
• Check if MFP port is not busy. Since functional
components of MFP (printer and scanner) share the same
I/O interface (MFP port), the situation of simultaneous
access of different “consumer” application to the same
MFP port is possible. To avoid possible conflicts, only one
of them at a time is allowed to gain control over the
device. The other “consumer” will encounter “device
busy” response. This can usually happen while starting
scan procedure, and appropriate message box will be
displayed.
The machine
doesn’t scan.
(continued)
• To identify the source of the problem, you should open
MFP ports configuration and select the port assigned to
your scanner. MFP port’s symbol /dev/mfp0 corresponds
to LP:0 designation displayed in the scanners’ options, /
dev/mfp1 relates to LP:1 and so on. USB ports start at /
dev/mfp4, so scanner on USB:0 relates to /dev/mfp4
respectively and so forth sequentially. In the Selected
port pane you can see if the port is occupied by some
other application. If this is the case, you should wait for
completion of the current job or should press Release
port button, if you are sure that the present port’s owner
is not functioning properly.
Problem Possible Cause and Solution


