


SETTING THE BUZZER
A buzzer can be set to sound during alarm recording, if
during recording the tape reaches the end, if buttons are
pressed or if there is a mechanical failure that causes the
tape to stop or be ejected, etc.
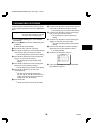
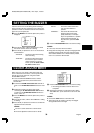
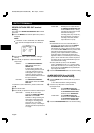
1 Press the MENU button until the (SET UP 2) menu is
displayed.
@@@@@@@<SET@UP@2>
*DISPLAY
@@@DATE@@@@@@@@@@@Y
@@@TIME@@@@@@@@@@@Y
@@@ALARM@COUNT@@@@Y
@@@SPEED@@@@@@@@@@Y
*BUZZER
@@@ALARM@IN@@@@@@@Y
@@@TAPE@END@@@@@@@Y
@@@KEY@IN@@@@@@@@@N
@@@WARNING@@@@@@@@Y
2
Press the ] button, until the desired item for which
the buzzer function will be set is flashing.
3
Press the l (or j) button to set “Y” for the functions
described below.
ALARM IN . . . The buzzer will be heard during
alarm recording.
TAPE END. . . The buzzer will be heard when
the end of the tape is reached
during recording. To stop the
buzzer, press the STOP, EJECT,
FF, REW or PLAY button.
KEY IN . . . . . . The buzzer will be heard when
one of the VCR buttons is
pressed.
WARNING . . . The buzzer will be heard if the
heads are dirty and recording
qualtiy deteriorate, or if the tape
stops or is ejected due to a problem
with the internal mechanism. To
stop the buzzer, press the STOP
button.
4 Press the PAUSE/SEARCH button to save the setting.
NOTES:
•
If “N” is set, the buzzer will not be heard.
•
During timer recording mode, security lock engaged mode
and alarm recording mode, the buzzer will not be heard
when a button related to one of these modes is pressed,
even if “Y” is set for the “KEY IN” item.
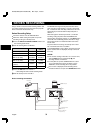
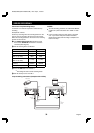
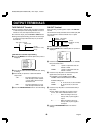
CLOCK ADJUSTMENT
When using 2 or more VCRs of this same model, the
clock on the second VCR and on, can be synchronized
with the clock on the first VCR, using the CLOCK
ADJUSTMENT function.
•
To use CLOCK ADJUSTMENT function, “INPUT
OUTPUT” in the (SET UP 5) menu must be set to
“CLOCK SET”.
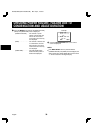
1
Connect the ALARM OUT/CLOCK OUT terminal on
VCR 1 to the ALARM IN/CLOCK IN terminal on VCR
2.
2
Repeat the procedure for all the other VCRs,
connecting the ALARM OUT/CLOCK OUT terminal
on VCR 2 to the ALARM IN/CLOCK IN terminal on
VCR 3, and so on.
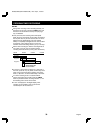
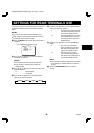
3
Press the MENU button until the (SET UP 3) menu is
displayed.
4
Press the ] button, until the “EXT TIME ADJ.” setting
is flashing.
5
Press the l (or j) button to set the hour at which the
adjustment will be conducted.
NOTES:
•
Be sure to set the same time on all the VCRs.
•
The clock adjustment cannot be set to “00:00”.
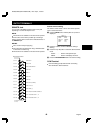
Example
@@@@@@@<SET@UP@3>
*ALARM@MODE@@@@@@@Y1
*ALARM@SPEED@@@@@@8H
*ALARM@DURATION@@@20S
*VERTICAL@SYNC@@@@Y
*EXT@TIME@ADJ.@@@@03:00
*TAPE@IN@MODE@@@@@STOP
*TAPE@END@MODE@@@@REW
*TAPE@END@OUT@@@@@-3M
*CLOG@DETECT.@@@@@Y
*SERIES@REC@IN@@@@N
6
Press the PAUSE/SEARCH button to save the setting.
°
The setting procedure on the first VCR is now
completed.
7
Repeat the procedure for all the other VCRs, setting
“EXT TIME ADJ.” (to the same time as set on the first
VCR).
NOTES:
•
Connect the COM terminal on all VCRs used.
•
This function will not operate on the day the daylight
saving/standard time is changed.
NU4QG/NA3 (SRT-2400DC GB) Mon. Sept., 17/2001
36
English