


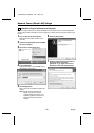


Network Camera (Wired LAN) Settings
3 NETWORK SET Settings
These settings are used in order to connect the camera to the network. After these settings have been
completed, you may also have to make wireless LAN settings or PPP settings. More than one camera
can be connected to the same network, but in order to do this, you will need to make settings for each
camera such as assigning separate IP addresses before connecting the cameras to the network.
☞
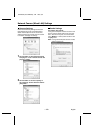
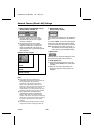
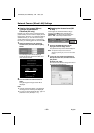
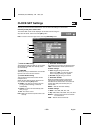
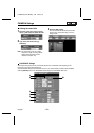
Click the [NETWORK] menu
select button.
The NETWORK SET screen will be displayed,
and the default settings for each item will be
displayed automatically.
Once you have completed making the settings,
click the [SET] button.
Note: Check with the network system
administrator or Internet Service Provider
if you need to change the IP address 1,
subnet mask 2 or gateway 3 settings.
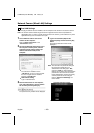
4
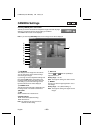
Set the password.
There are three access levels available (User,
Operator and Administrator) and separate
passwords can be set for each level. The factory
default settings are shown in Table 1 (p. 23),
and the range of operations varies as indicated
for each access level.
Note: It is recommended that you change the
passwords whenever possible for security
purposes. (p. 21)
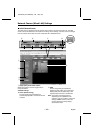
5
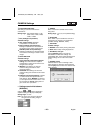
NETWORK SPEED
This sets the speed of data transmission by the
camera.
Available settings:
64, 128, 256, 512, 1024 (Kbps), NO LIMIT
(Default setting: No limit for transmission speed)
6
HTTP PORT NUMBER
(default setting: 80)
This setting is used when more than one camera
is connected to a broadband router and a single
IP address for that router is being used to make
the images being monitored by the camera
publicly available over the Internet. Refer to the
documentation provided with the broadband
router for further details.
Normally the HTTP PORT NUMBER setting
should be left “80” without being changed, even
if more than one camera is connected to the
network.
4
5
6
7
1
2
3
Reset if necessary
Default settings displayed
L5AM2/US (VCC-WB4000) GB 2003, 6, 6
– 20 –
English