12
Connecting the monitor and turning the monitor on and off
Notes:
- Before connecting, ensure that the shape of the
USB cable connector is correct.
- For information regarding the USB function (such
as set-up) please refer to the operation manual of
the computer to be connected.
- Some computers, OS and other devices may not
be able to be activated. To ascertain a certain
device's USB compatibility, please contact the
manufacturer of the device.
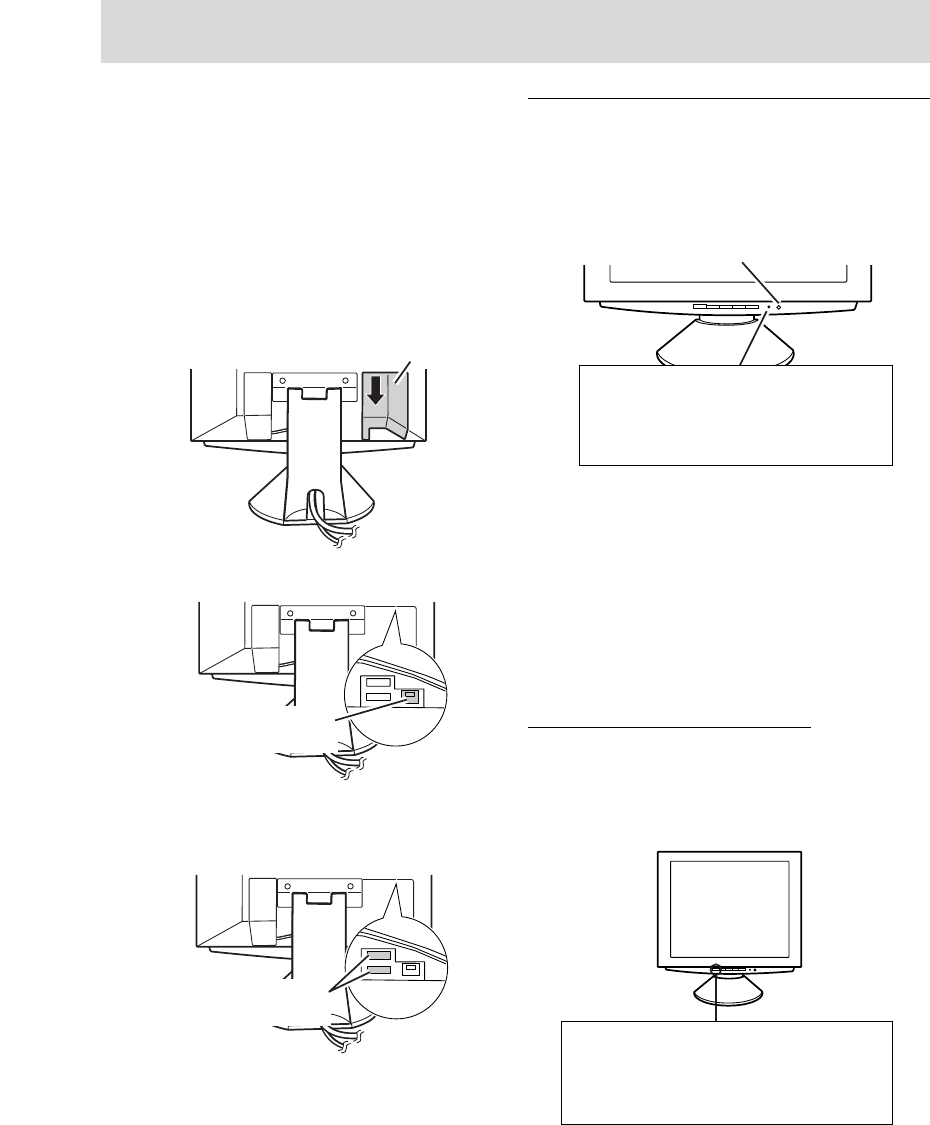
1. Remove the cover.
2. Plug one end of the USB cable (provided) into the
monitor's USB upstream port.
3. Connect the other end of the USB cable into the
computer or the USB downstream port.
4. Plug the USB device into the monitor’s USB
downstream port.
5. Replace the cover.
(Rear View)
Cover
USB port: Upstream
(1 port)
USB port: Downstream
(2 ports)
Turning the power on
1. Turn on the computer.
2. Press the monitor's power button. The power
LED will be lit green, and the screen will display
an image.
Notes:
- Depending on the computer or OS, it may be
necessary to use the computer to install monitor
set-up information. If so, follow the steps below to
install the monitor set-up information. (p. 13)
- When setting up the monitor or a connected
computer for the first time, connecting an
additional computer or after having changed an
aspect of the current system, perform an
automatic screen adjustment before use (p. 17).
Changing between input terminals
(INPUT 1
↔↔
↔↔
↔ 2)
When connected to two computers, use the INPUT
button to switch between input signal terminals (i.e.
to choose which computer's screen you want dis-
played.)
Press power button
Power LED
Green light: In use
Orange light: Power saving mode or signal
failure
Lamp off: Power OFF
INPUT button
Pushing this button switches between input
signal terminals, so that the screen changes
to display any of the machines connected.


