


45
Useful
Features
2
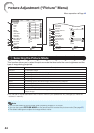
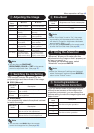
Adjusting the Image
Adjustment
items
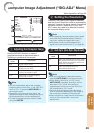
? button _ button
Contrast For less contrast. For more contrast.
Bright For less brightness.
For more brightness.
Color For less color
intensity.
For more color
intensity.
Tint For making skin
tones purplish.
For making skin
tones greenish.
Sharp For less sharpness.
For more sharpness.
Red Gain For making images
less reddish.
For making images
more reddish.
Green Gain For making images
less greenish.
For making images
more greenish.
Blue Gain For making images
less bluish.
For making images
more bluish.
CLR Temp
For making images
slightly more reddish
(slightly warmer colors).
For making images
slightly more bluish
(slightly cooler colors).
You can also use CONTRAST,
BRIGHTNESS, COLOR or TINT on the remote
cntorol to adjust each item. (See page
37.)
•
Note
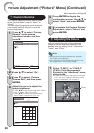
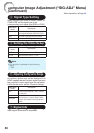
Switching the Iris Setting
This function controls the quantity of the
projected light and the contrast of the image.
IRIS1 (Manual)
Selectable
items
Description
High
Brightness
This mode gives priority to brightness
over contrast.
High
Contrast
This mode gives priority to contrast
over brightness.
IRIS2 (Auto)
This automatically selects the optimal contrast
to match the image.
Selectable
items
Description
On This mode gives priority to contrast
with the use of auto adjustment.
Off This mode gives priority to brightness
without the use of auto adjustment.
You can also use IRIS 1/2 on the remote
control to change the Iris. (See page
38.)
•
Note
■
■
4
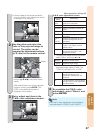
Eco+Quiet
Selectable
items
Brightness and Power consumption
On Approx. 70%
Off 100%
When “Eco+Quiet” is set to “On”, the power
consumption will decrease and the lamp life
will extend. (Projection brightness decreases
approximately 30%.)
You can also use ECO+QUIET on the remote control
to switch the Eco+Quiet mode. (See page
38.)
•
•
Note
5
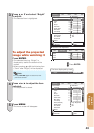
Using the Advanced
“Advanced” allows you to make even fi ner
adjustments to the image so that it appears just
the way you want it to.
To display the Advanced menu, select
“Advanced” and press ENTER.
When the “Advanced” settings are displayed,
select “Advanced” again and press ENTER to
return to the “Picture” menu.
•
Note
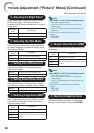
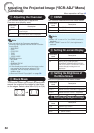
Correcting Gradation of
Video (Gamma Correction)
When the darker areas of the image become
diffi cult to see because of the image or the
projection environment, you can correct the
gamma setting to make the image brighter and
easier to see.
Selectable
items
Description
+2
Provides a brighter gradation.
+1
0 Standard setting
–1
Provides a darker gradation.
–2
Menu operation n Page 42