


48
9
Adjusting the Bright Boost
Bright Boost uses Texas Instruments’ Bright
Boost technology. The image becomes
brighter while the color reproduction is kept at
a high level.
Selectable
items
Description
On
The Bright Boost function is activated.
Off
The Bright Boost function is not activated.
0
Selecting the Film Mode
This function provides high-quality playback
of images originally projected at 24 fps, such
as movies on DVDs.
Selectable
items
Description
Auto Films are detected automatically.
Off Films are not detected.
⑅
Setting Color Enhancement
This function makes the projected images
clearer and crisper.
? button
Provides less color enhancement.
_ button
Provides more color enhancement.
Z
Setting Detail Enhancement
This function enhances the details in images
and, thereby, creates a greater sense of depth.
? button
Provides less detail enhancement.
_ button
Provides more detail enhancement.
H
Reducing Image Noise (DNR)
Video digital noise reduction (DNR) provides
high quality images with minimal dot crawl
and cross color noise.
Selectable
items
Description
Off The DNR function is not activated.
Level 1
Sets the DNR level for viewing a clearer
picture.
Level 2
Level 3
Set “DNR” to “Off” in the following cases:
- When the image is blurry.
- When the contours and colors of moving
images drag.
- When TV broadcasts with weak signals are
projected.
This function is available for the following
signals.
- 480
I
/480P
- 576
I
/576P
•
•
Note
U
Mosquito Noise Reduction (MNR)
The so-called Mosquito Noise (fl ickering) can
be reduced.
Selectable
items
Description
Off MNR does not function.
Level 1
Sets the MNR level for viewing a clearer
picture.
Level 2
Level 3
Set “MNR” to “Off” in the following cases:
- When the image is blurry.
- When the contours and colors of moving
images drag.
- When TV broadcasts with weak signals are
projected.
This function is available for the following
signals.
- 480
I
/480P
- 576
I
/576P
•
•
Note
W
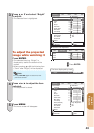
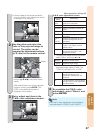
Resetting All Adjustment Items
To reset all adjustment items to the default
settings, select “Reset” and press ENTER.
Picture Adjustment (“Picture” Menu) (Continued)
Menu operation n Page 42