


Installation Guide
54 2130163
Please consult the appropriate documentation and support
resources to ensure that the software and hardware are
properly installed and configured. Test other connection types
(voice, data) to ensure that the modem is working properly
before proceeding.
Initial WinFax setup
Note: After configuration, if the
AirCard is not inserted before
WinFax PRO is launched, the
WinFax settings for the AirCard
are lost and you must re-enter
them.
Note: WinFax PRO 10.0 must already be installed on your computer.
Also ensure that the AirCard is inserted in your computer’s PCMCIA
(PC Card) slot before proceeding.
1. Launch the WinFax PRO Message Manager as described in
your WinFax documentation (via the Start menu or
desktop icon).
2. From the menu bar, choose
Tools > Program Setup.
3. Double-click
Modems and Communications Devices.
4. Check the Active box for the
Sierra Wireless AirCard 555
Modem
only. Uncheck any other Active checkboxes for all
other devices.
If a message appears, saying that “
The AirCard 555 has not
been configured to work with WinFax PRO. Do you want to run
the WinFax PRO modem configuration wizard now?”, choose
Yes and accept the defaults for the wizard (Next, Next, Next,
and
Finish). Otherwise skip to step 5.
5. When prompted for Locations, choose
Cellular (PCS/GSM-
Digital)
only. (You may need to check the Active box for the
AirCard 555 again.)
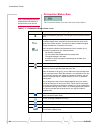
Modem Properties
6. Highlight
Sierra Wireless AirCard 555 Modem and choose
Properties.
7. Select the
General tab.
8. Under
Communications Port, ensure that TAPI and Initialize at
19200 bps
are selected.
9. Under the Modem Type category, ensure that Class 2.0 is
selected.
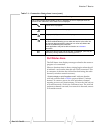
10. Select the
Fax tab.
11. Ensure that
Regular or Cellular (PCS-GSM-Digital) has been
selected from the
Modem Connection drop-down list.
12. In the
Initialization String Sequence section, the fields should
be filled in as follows:
·
AT&F&C1&D2S7=55 (May or may not be set by default.)
·
ATE1V1
· AT$QCVAD=2