


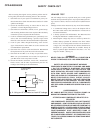
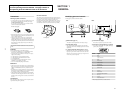


1-5
12
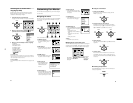
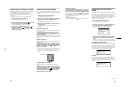
Adjusting the convergence (CONV)
The CONV settings allow you to adjust the quality of the picture
by controlling the convergence. The convergence refers to the
alignment of the red, green, and blue color signals.
If you see red or blue shadows around letters or lines, adjust the
convergence.
These settings are stored in memory for all input signals.
1
Press the center of the control button.
The main MENU appears on the screen.
2
Move the control button to highlight CONV and
press the center of the control button again.
The CONVERGENCE menu appears on the screen.
3
First move the control button m/M to select for
horizontal adjustment, or for vertical
adjustment. Then move the control button </, to
adjust the convergence.
Additional settings (OPTION)
You can manually degauss (demagnetize) the monitor, adjust the
moire cancellation level, change the menu position, and lock the
controls.
1
Press the center of the control button.
The main MENU appears on the screen.
2
Move the control button to highlight OPTION and
press the center of the control button again.
The OPTION menu appears on the screen.
3
Move the control button m/M to select the desired
adjustment item.
Adjust the selected item according to the following
instructions.
Degaussing the screen
The monitor is automatically demagnetized (degaussed) when the
power is turned on.
To manually degauss the monitor, first move the
control button m/M to select (DEGAUSS). Then move
the control button ,.
The screen is degaussed for about 5 seconds. If a second degauss
cycle is needed, allow a minimum interval of 20 minutes for the
best result.
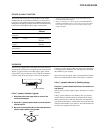
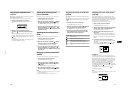
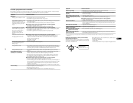
Adjusting the moire*
If elliptical or wavy patterns appear on the screen, adjust the moire
cancellation level.
To adjust the amount of moire cancellation, first move
the control button m/M to select (MOIRE ADJUST).
Then move the control button </, until the moire
effect is at a minimum.
* Moire is a type of natural interference which produces soft, wavy lines
on your screen. It may appear due to interference between the pattern
of the picture on the screen and the phosphor pitch pattern of the
monitor.
Changing the menu’s position
Change the menu’s position if it is blocking an image on the
screen.
To change the menu’s on-screen position, first move
the control button m/M to select (OSD H POSITION)
for horizontal adjustment, or (OSD V POSITION) for
vertical adjustment. Then move the control button
</, to shift the on-screen menu.
Example of moire
13
US
Locking the controls
To protect adjustment data by locking the controls, first
move the control button m/M to select (CONTROL
LOCK). Then move the control button ,, to select ON.
Only the 1 (power) switch, EXIT, and (CONTROL LOCK)
of the OPTION menu will operate. If any other items are selected,
the mark appears on the screen.
To cancel the control lock
Repeat the procedure above and set (CONTROL LOCK) to OFF.
Helpful hints and information
(HELP)
The HELP menu contains helpful hints and information about this
monitor. If your monitor is displaying symptoms that match those
listed in the HELP menu, follow the on-screen instructions to
resolve the problem. If the symptoms do not match those listed in
the HELP menu or if the problem persists, see “Trouble
symptoms and remedies” on page 16.
1
Press the center of the control button.
The main MENU appears on the screen.
2
Move the control button to highlight HELP and
press the center of the control button again.
The following HELP menu appears on the screen.
3
Move the control button m/M to select a HELP menu
item and press the center of the control button
again.
Instructions or information to resolve the problem appears on
the screen. An explanation of each menu item is given below.
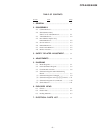
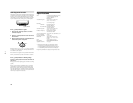
RECOMMENDED RESOLUTION
If the picture does not fill the screen to the edges or if the picture
appears too large for the screen, adjust the resolution to the figures
shown in the menu using your computer. If the input signal
matches one of this monitor’s factory preset modes, the resolution
and refresh rate of the current input signal are displayed.
FLICKER
If the picture is flickering, adjust the refresh rate to figures shown
in the menu. If the input signal matches one of this monitor’s
factory preset modes, the refresh rate of the current input signal is
displayed.
RETURN TO MAIN MENU
RECOMMENDED RESOLUTION
FLICKER
TH IN HOR IZONTAL LI NE
DISTORTED SHAPE
OUT OF FOCUS
D I SCOLORATI ON
HELP
SET RESOLUTION TO
1280X1024 AT 85Hz USING PC.
CURRENT SETT ING IS
1280X1024 AT 75Hz.
RECOMMENDED RESOLUTION
SET REFRESH RATE TO
75Hz OR 85Hz USING PC.
CURRENT SETT ING IS 60Hz .
FLICKER
(continued)