


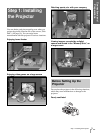

Step 1: Installing the Projector
Connections and
Preparations
GB
8
Highly heated and humid
Very dusty and extremely smoky
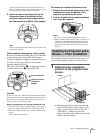
Do not use the projector under the following
conditions:
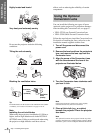
Tilting the unit extremely
Blocking the ventilation holes
Tip
For further details on the location of the ventilation holes (intake
or exhaust), see “Location of Controls” on pages 74 to 76.
Note
Installing the unit at altitudes
When using the projector at an altitude of 1,500 m or
higher, turn on high altitude mode in the INSTALL
SETTING menu. Failing to set this mode when using
the projector at high altitudes could have adverse
effects, such as reducing the reliability of certain
components.
Using the Optional
Conversion Lens
You can install the following two types of lenses
(optional) on the projector. For projection distances
when installing the Conversion Lens, see page 67.
• VPLL-CT10 Long Focused Conversion Lens
• VPLL-CW10 Short Focused Conversion Lens
Follow the steps below to install the Conversion Lens.
For details on installing the Lens, refer also to the
installation manual supplied with the Lens.
1 Turn off the power and disconnect the
power cord.
2 Remove the lens hood from the projector’s
lens, and remove the lens cap from the
Conversion Lens.
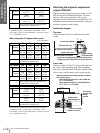
3 Align the screw of the Conversion Lens
with the thread around the lens of the
projector as illustrated below.
4 Turn the Conversion Lens clockwise until
you hear it click.
Note
If the Conversion Lens is hard to turn, turn it slightly
counterclockwise first, then turn it clockwise.
5 Place a thick cloth (e.g., a cushion)
beneath the projector. Place the projector
face down.
Note
The optional Conversion Lens projects from the top of the
projector when the Lens is installed on the projector. Before
installation, place a cloth of adequate thickness beneath the
15˚
15˚
Ventilation
holes
(exhaust)
Ventilation
holes
(intake)