


Introduction
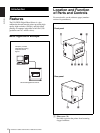
Location and Function of Parts and Controls
5
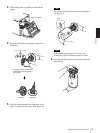
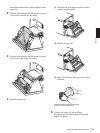
B Paper output slot
Printed pages are output from the printer here.
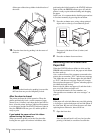
C Lock lever for the front door
Used to open the front door when loading or
replacing the ink ribbon and paper roll, or cleaning.
Caution
The front door is very heavy. Be careful when
opening it.
D Paper scrap tray (17)
While printing, a margin is left between printouts.
The excess portions of these margins are cut and
dropped into this paper scrap tray.
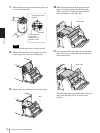
E STATUS indicator
Indicates the status of the printer.
For detailed information on how this indicator light
so, and its meaning, see “Relationship Between the
STATUS Indicator and the ERROR indicator” on
page 5.
F ERROR indicator
Indicates the error status of the printer.
For detailed information on how this indicator light
so, and its meaning, see “Relationship Between the
STATUS Indicator and the ERROR indicator” on
page 5.
G Cut button (14)
Press this button using a sharp-pointed object such
as a tip of a mechanical pencil, while the STATUS
indicator is lit in blue to feed roll paper by about 10
cm (4 inches) and chop off the fed excess paper.
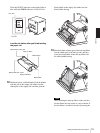
H !Power switch
Press this switch to turn the printer on or off.
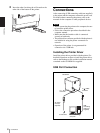
I - AC IN (power source) connector (8)
Use the proper power cord for your local power
supply (not supplied). Refer to “Warning on power
connection” on page 2.
J USB connector (8)
Connects to a computer equipped with a USB
interface (USB 2.0), using a USB cable (not
supplied).
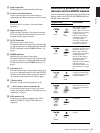
Relationship Between the STATUS
Indicator and the ERROR indicator
You can confirm the status of the printer according to the
lighting status of the STATUS and ERROR indicators
located on the front panel.
Indicator status Printer status
STATUS ERROR
Recoverable errors such as
“door open,” “replace
paper,” and so on. The error
message and error number
are displayed on the
monitor of the computer
connected to the printer.
Solve the problem,
referring to “Recoverable
error numbers and error
messages” on page 23.
Errors requiring you to turn
the printer off and on. Turn
the printer off once, and
then on again. The error
message and error number
are displayed on the
monitor of the computer
connected to the printer.
Solve the problem,
referring to “Error numbers
and error messages
requiring the printer to be
turned off and on” on page
22.
Means “Paper loading is
completed” when loading
or replacing the paper roll
and the ink ribbon.
Means paper roll or the ink
ribbon has been used up.
Load a new paper roll and
ink ribbon.
Means image data is being
transferred.
Means the printer is
printing.
Lit
(Red)
Not lit
Blinks
(Red)
Not lit
Lit
(Blue)
Lit
(Red)
Blinks
(White)
Blinks
(Red)
Blinks
(White)
Not lit
Lit
(White)
Not lit