


4-26 User’s Manual
A300
Disclaimer
Toshiba does not guarantee that the face recognition utility technology will
be completely secure or error-free. Toshiba does not guarantee that the
face recognition utility will accurately screen out unauthorized users at all
times. Toshiba is not liable for any failure or damage that might arise out of
the use of the face recognition software or utility.
TOSHIBA, ITS AFFILIATES AND SUPPLIERS SHALL HAVE NO
RESPONSIBILITY FOR DAMAGE TO OR LOSS OF ANY BUSINESS,
PROFITS, PROGRAMS, DATA, NETWORK SYSTEMS OR REMOVABLE
STORAGE MEDIA ARISING OUT OF OR RESULTING FROM THE USE
OF THE PRODUCT, EVEN IF ADVISED OF THE POSSIBILITY
THEREOF.
When using the feature “Log Record function” of the Toshiba Face
Recognition software please make sure that the usage is in line with
applicable legal requirements especially data protection laws in your
country of usage as well as with company internal regulations if any.
TOSHIBA Face Recognition records face data in a log when face
recognition fails. When transferring ownership or disposing of your PC,
please uninstall the application or delete all the logs created by the
application. For details on how to do this, see help file.
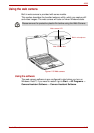
How to register the Face Recognition Data
Take a picture for facial verification purposes, and register the data needed
when you log in. To register the data needed when you log in, follow the
steps as described below:
1. To launch this utility, click Start -> All Programs -> TOSHIBA ->
Utilities -> TOSHIBA Face Recognition.
■ The Registration screen is displayed for a logged-in user whose
face has not been registered.
■ The Management screen is displayed for a logged-in user whose
face has already been registered.
2. If your a registered user, click the Register face button in the
Management screen, otherwise the Registration screen will be
displayed.
■ If you wish to practice, click on the Next button in the Registration
screen.
■ If you do not wish to practice, click on the Skip button in the
Registration screen.
3. Click the Next button to start the guide.
4. First, take a picture while moving your neck slightly to the left and right.
5. Now take a picture while moving your neck down and up.
■ Click the Back button to practice the guide once more.
6. Click the Next button to start image-capturing process. Adjust the
position of your face so that it fits within the face-shaped frame.