


Description of Each Component 31
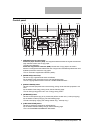
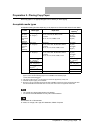
17. [DATA] lamp
This lamp blinks when print data are being received.
18. [CANCEL] button
Use this to cancel the current setting and return to the previous menu.
19. [ENTER] button
Use this to determine items or operation selected in each menu.
20. / / / (UP/DOWN/LEFT/RIGHT) buttons
Use them to select items you want to set in each menu. The selected item is highlighted.
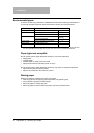
21. Original mode button/lamps
Use this button to set the image quality of copy according to that of an original.
For the details of image quality, see the following page:
P.79 “Selecting Image Mode”
22. Density adjustment buttons/lamps
Use this button to adjust the density of copy image. The [AUTO] lamp below the
(automatic copy density mode) button is lit when the density is being automatically adjusted.
For the details of density adjustment, see the following page:
P.80 “Adjusting Density Level”
23. [DRAWER] button/lamps
Use this button to select a drawer or the bypass tray to be used as a paper source. The lamp
of the paper source currently selected is lit. The lamp blinks when the selected drawer or tray
is running out of paper.
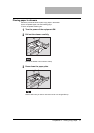
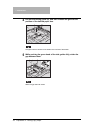
When paper in the drawer or on the bypass tray has run out, see the following page to add
paper:
P.35 “Preparation 2 - Placing Copy Paper”
24. [COPY] button/lamps
Use this button to select the size of paper to be used. The lamp of the paper size currently
selected blinks when this size of paper is not placed in the drawer or on the bypass tray.
See the following page for details:
P.70 “Manual paper selection”
25. [ORIGINAL] button/lamps
Use this button to specify the size of an original.
P.76 “Specifying both the sizes of the original and the copy paper”