


Selecting HD Format
To select the display mode, follow the steps as detailed below:
1. Click Start -> Control Panel.
2. Click Appearance and Personalization.
3. Click Display.
4. Click Change display settings.
5. Click Advanced settings.
6. Click List All Modes.
7. Select one of the mode at List All Modes.
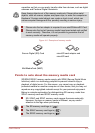
Wireless display
Some models support Intel Wireless Display (Intel WiDi), a wireless
technology which utilizes Wi-Fi to allow the computer to be wirelessly
connected to external displays including TVs as extended screens. With
Intel WiDi, documents, streamed/local media contents or other online
contents can be shared wirelessly with others.
To use Intel WiDi, either one of the following devices is required:
A compatible external display with built-in support for Intel WiDi.
An external display with HDMI port and a digital adaptor featuring Intel
WiDi.
The adaptor is a device that connects to the external display via HDMI
port and can receive Wi-Fi signals from your computer.
Type "Intel WiDi" from the Start menu and click Intel(R) WiDi. Intel WiDi
application will launch and you are ready to start the connection.
To learn more details on how to complete the connection, please refer to
the application help.
Some copy protected media contents may not play on the external displays
via Intel WiDi.
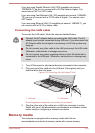
Changing the external playback settings
After one or more external displays are connected, the operating system
can automatically detect, identify and setup the display settings.
You can also manually manage how the external displays will work and
change the display settings by pressing P while holding down the
Windows (
) key. If you disconnect the external display before you turn
the computer's power off, be sure to switch to the internal display.
When you change the display output device, the audio playback device
may not switch automatically. In this case, in order to set the playback
device to the same device as the display output device, please adjust the
audio playback device manually by the following steps:
User's Manual 4-28