22 VISIONEER ONETOUCH 9120 USB SCANNER INSTALLATION GUIDE
You can click the AutoScan button to scan with optimum settings for
the image, or you can manually preview the image and adjust scan
settings as required. These two options are described below.
To scan using AutoScan:
1. Click AutoScan.
Your OneTouch 9120 scanner has built-in analytical capabilities
that find the optimum combination of settings (brightness,
sharpness, contrast, and so on) for the item you’re scanning. When
you click AutoScan, the scanner determines if the image is color,
grayscale, or black and white, and analyzes the image and adjusts
the settings to produce the optimal image.
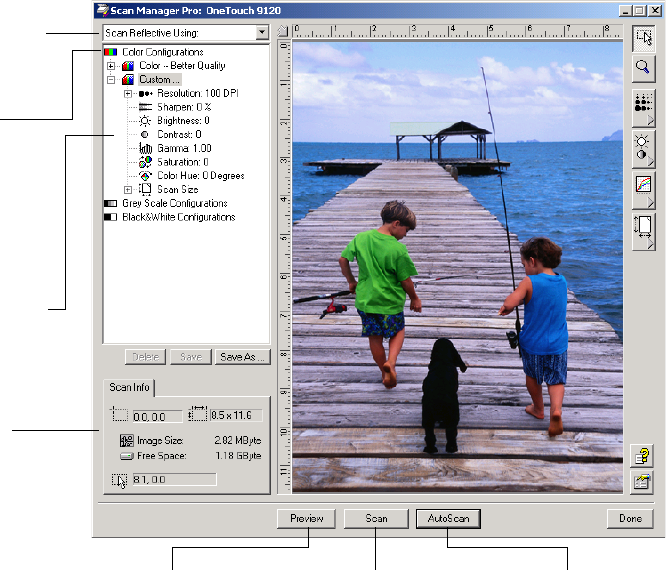
Click an icon to select a
configuration—Color, Grey
Scale, or Black&White.
Clicking the “+” sign in front of
Custom shows Custom’s scan
settings.
Click a setting in the list to
change it. The setting’s options
appear on the right side of the
Scan Manager Pro where you
can make changes if necessary.
Click AutoScan to scan
with optimum settings
adjusted automatically.
When you are satisfied
with the scan settings,
click Scan.
Click Preview to view the
image in the window.
Check the Scan Info to
make sure your computer
has sufficient space for the
image. Warning icons on
this box appear if your
computer does not have
enough space for the
scanned image’s file.
Choose a scanning option. Scan
Reflective Using is for scanning
paper items. The other options
are for transparencies.
