


CONFIGURATION AND RESOURCE UTILITY (MVS)
Create Configuration Description
The Xerox Resource Utility, Create Configuration Description
screen allows you to create configuration descriptions for the
internal interface card on the host.
The configuration description object or file converts the values
selected from the screen to the appropriate Function Selection
via Line (FSL). The Function Selection via Line (FSL) is created
when the Create Configuration Description screen is exited and
stored in XMRPV1R2M1CFGDLIB partitioned data set (PDS).
Each time the Create Configuration Description command is
executed, the FSL is recreated. There is an option from the
Create Configuration Screen to download the description to the
printer.
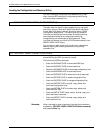
To create this Configuration Description screen, enter on the
selection line or command line:
TSO EXEC ‘XMRPV1R2M1CLIST(CRTCFGD)’
Press the Enter key.
Refer to the “Clist Code Listings” section in this chapter for
additional information.
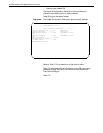
1st screen The Create Configuration Description first screen displays:
--------------------XEROX RESOURCE UTILITY Ver
1.2.1--------------------
---------------------CREATE CONFIGURATION
DESCRIPTION---------------------
------------(Value 'NONE' does not create FSL for the
CFGD---------------
NAME OF CONFIG DESCRIPTION = = => NAME
LINES PER INCH = = => 6 NONE,0,3,4,6,8
CHARACTERS PER INCH = = => 10 NONE,10,12,15,16,20,27
LINE SPACING = = => SINGLE NONE,SINGLE, DOUBLE
FORM LENGTH = = => 62 NONE,0 to 255
MAXIMUM PRINT POSITION = = => 132 NONE,0 to 255
CASE = = => DUAL NONE,MONO,DUAL
PAGE FORMAT = = => PORT NONE,PORT,LAND,COR
PAPER PATH = = => TRAY 1
NONE,TRAY1,TRAY2,TRAY3,TRAY4,TRAY5,
MIDDLE,UPPER,LOWER,MAN-
PAP,MAN-ENV
PAPER SIZE = = => LETTER
NONE,LETTER,LEGAL,A4,EXEC,MON,
BUS,DL,C5,A3,LEDGER
LINE OVERFLOW OPTION = = => TRUNCATE NONE,WRAP,TRUNCATE
DUPLEX PRINTING = = => SIMPLEX NONE,SIMPLEX,LONG,SHORT
FORM FEED BEFORE LOCAL CPY = = => NO NONE,YES,N
The screen has three columns. Column 1 shows the various FSL
commands. Column 2 is where you enter your choice of
parameter values found in column 3. Default values are
displayed in column 2.
N Note: Although the screen displays 16 in the Characters
Per Inch field, the printer uses 16.7.
Remember You enter your options in the Default parameter fields (column
2) and press the Enter key to execute the command.
There are two validated fields in the Create Configuration
Description screen:
• Name of Configuration Description
XEROX MRP FAMILY COAX COMMAND REFERENCE 7-19