


37 604P15800
Before You Start
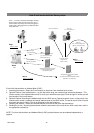
Verify the Ethernet connection is complete and the
desired speed is set. Then return to this page.
NOTE: Clear all faults, messages and jams before
continuing.
Immediate Image Overwrite...
Ensures that all information related to a job is
immediately overwritten after the successful completion
of each job.
After installation by a Xerox Customer Service Engineer,
the feature should be set to On (enabled) by default. To
view or change this setting, perform the following steps.
Go to the printer and...
1. Enter the Tools pathway.
a) Press the Access ( or ) button.
b) On the keypad enter 1111 or the current
password. Press Enter. The Touch Screen will
be used for the remainder of the data entry,
unless instructed otherwise.
2. Enter setup menus
a) Press More
b) Press Configuration and Setup.
c) Press Optional Services.
d) Press Overwrite Security.
3. When the Overwrite Security screen displays, note
which of the two selection buttons is highlighted as
the current setting. The available settings are
Enable and Disable.
a) To change settings, press Enable or Disable,
then press Save. To exit the settings screen,
without making any changes, press Cancel.
b) Press Exit Tools. If changes were made, the
machine will reboot automatically.
On Demand Overwrite from the printer...
Irretrievably overwrites all of the physical areas of the
disks that hold data. All jobs in the active queue will be
deleted and overwritten. Jobs sent during the overwrite
process are held and released after the overwrite
process has finished.
After installation by a Xerox Customer Service
Engineer, the feature should be set to On (enabled) by
default. To view or change this setting, perform the
following steps.
Go to the printer and...
1. Enter the Tools pathway.
a) Press the Access ( or ) button.
b) On the keypad enter 1111 or the current
password. Press Enter. The Touch Screen
will be used for the remainder of the data
entry, unless instructed otherwise.
2. Enter Overwite menu
a) Press More.(upto2times)
b) Press On Demand Overwrite.
c) Press Start.
NOTE: A screen will appear to confirm that this proce-
dure will delete image data from the hard disks. Any ex-
isting jobs in the queue will be deleted. The machine
will be taken offline and will be unable to receive any in-
coming jobs. Internet Services will not be available until
the machine reboots and comes back online.
The On Demand Overwrite will overwrite all image data
on the hard disks. The process takes up to 20 minutes.
To cancel the overwrite procedure press Abort. Enter
the current administrator password. The overwrite pro-
cedure may have already started at this stage. Press
Back to continue with the overwrite.
Following completion of the On Demand Overwrite the
Network Controller will reboot. A confirmation sheet will
print. To verify the overwrite has completed view the
Confirmation Sheet, under Confirmation Details. The
Job Information: Status ESS Disk should read 'SUC-
CESS'. The Status Image Disk should read 'SUC-
CESS'.
Image Overwrite Security