


WinFax PRO Fax Sharing
22
… where “drive and path” is the CD ROM drive containing the
WinFax installation CD or the location of the WinFax installation files
on the network.
4 Click OK. The Setup program starts.
5 Follow the instructions on the screen. Click Next to proceed.
6 When the Modems And Communications Devices panel appears,
click the WinFax PRO Fax Sharing device and click Next.
Note: You can also set up Fax Sharing after you install WinFax. To
do this, start Program Setup (see page 11), double click Modems
And Communications Devices, and then enable the Active check
box beside the WinFax PRO Fax Sharing fax device.
7 Follow the instructions on the screen. Click Next to proceed.
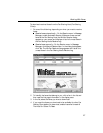
8 When prompted to configure the WinFax PRO Fax Sharing device,
click Yes. The WinFax Fax Sharing Client Properties dialog
appears.
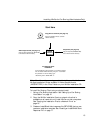
9 In the Host Name section, click Browse, select the Fax Sharing
Host station you want to use to send and receive faxes, and then
click Open.
10 In the Password field, type the password required to access the
specified Fax Sharing Host station (if a password exists—see your
WinFax administrator for details).
11 If you want WinFax to automatically check for new faxes each
time you start WinFax, enable Check For New Events On Startup.
12 Click Next. WinFax pings the selected Host station to confirm
connectivity, and connects your Client station to that Host. This
may take a few minutes.
13 Click Finish to save your settings and exit the Fax Sharing Client
Properties wizard.
Modifying Fax Sharing Client Settings
You can modify your Fax Sharing Client settings at any time. For example,
if your network has multiple Fax Sharing Host stations, you can switch to
another Fax Sharing Host.
To modify Fax Sharing Client settings:
1 Start Program Setup (see page 11).