


Scanning
Xerox
®
WorkCentre
®
4265 Multifunction Printer 113
User Guide
Scanning to an Email Address
When using this feature, the images you scan are sent as email attachments.
Before scanning to email, configure the email SMTP and From Field properties. You must have at least
one email address in the address book. If email properties are not properly configured, the Email icon
appears grayed out on the touch screen.
To scan an image and send it to an email address:
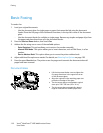
1. Load the original on the document glass or in the document feeder.
2. Press the Services Home button, then touch Email.
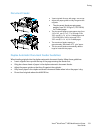
3. To enter an email address, do the following.
a. Touch Enter Recipient.
b. Touch the down arrow, then from the menu, select To: or Cc: or Bcc:.
c. Type the email address.
d. Touch OK.
4. To enter an email address from the network address book, do the following.
a. Touch Device Address Book.
b. Select the desired name from the list, then touch OK.
5. To add a subject line, do the following.
a. Touch Subject, then type the desired text.
b. To modify the default subject, touch X to delete it, or type over the existing text.
c. Touch OK.
6. To change any of the scan settings, use options on the More Features tab.
7. Press the green Start button.