


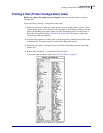


Getting Started
Connecting your Printer to a Computer
24
980611-001 Rev. C GX420d™ / GX430d™ User Guide 8/4/10
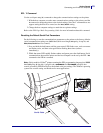
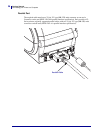
Serial Communications
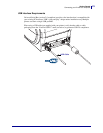
The printer automatically detects and switches the serial port to match common serial port
cabling and signal connection configurations for DTE and DCE communications. The required
cable must have a nine-pin “D” type (DB-9P) male connector on one end which plugs into the
mating (DB-9S) serial port located on the back of the printer. The other end of this signal
interface cable connects to a serial port on the host computer. This allows for the use of two
common cable types and drop-in replacement for Zebra and other printer models. Zebra
®
printers use a Null Modem (cross-over) cable. Early models of Zebra
®
printers (a DCE device)
running the EPL programming utilized a straight through (no cross-over) signal connections
cable. For pinout information, refer to Appendix A.
The serial port communication settings between the printer and host (typically a PC) must
match for reliable communication. The Bits per second (or Baud rate) and Flow control are the
most common settings that get changed. The host (typically a Windows PC) needs to have the
data Flow control changed to match the printer’s default communication method: Hardware
and is noted by the Host Handshake setting DTR/Xon/Xoff for legacy printer. This
combined hardware (DTR) and software (Xon/Xoff) mode may need to change depending
upon the non-Zebra application software and the serial cable variation in use.
Serial communications between the printer and the host computer can be set by:
• Autobaud synchronization
• ZPL programming ^SC command
• EPL programming Y command
• Resetting the printer to its default printer configuration.
Autobaud
Autobaud synchronization allows the printer to automatically match the communication
parameters of the host computer. To autobaud:
1. Press and hold the feed button until the green status LED flashes once, twice, and then
three times.
2. While the status LED flashes, send the ^XA^XZ command sequence to the printer.
3. When the printer and host are synchronized, the LED changes to solid green. (No labels
will print during autobaud synchronization.)
ZPL ^SC Command
Use the Set Communications (^SC) command to change the communications settings on the
printer.
1. With the host computer set at the same communications settings as the printer, send the
^SC command to change the printer to the desired settings.
2. Change the host computer settings to match the new printer settings.
Refer to the ZPL Programming Guide for more information about this command.