


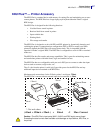

Printer Options
Bluetooth Option
62
980611-001 Rev. C GX420d™ / GX430d™ User Guide 8/4/10
Preparing the Windows PC for Bluetooth communication.
• Install a Bluetooth dongle or verify that the existing Bluetooth is enabled. Note that some
systems with on-board Bluetooth share the Bluetooth radio with Wi-Fi. Wi-Fi maybe
disabled, which may disable Bluetooth also.
Preparing the Printer for Bluetooth Printing
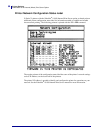
• The printer must have the factory option Bluetooth installed. The printer will include a
LCD display. The printer’s main menu screen will display the word Bluetooth.
• The printer should have media loaded to print configuration status labels (and Windows
test print labels later).
• Install the printer using the Zebra Setup Utility (ZSU) using the USB interface cable
(or a standard serial port cable). Verify printing using the printer properties or the ZSU to
print a printer configuration status label.
• With the ZSU installed and open, select your printer. The buttons below the installed
Zebra
®
printers will activate. Click on the ‘Configure Printer Connectivity’ button to start
the ‘Connectivity Setup Wizard’.
• Select Bluetooth and click ‘Next’.
• Enter an unique name for the printer to the ‘Friendly name’ text input box.
• Leave ‘Enabled’ checked, Discoverable’ On, and ‘Authentication’ to Off.
Click ‘Next’ to continue.
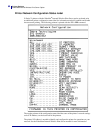
• The window will display the SGD (Set/Get/Do) commands to be sent to the printer.
Click ‘Next’.
• Leave the printer selected and click ‘Finished’. The printer will reset to activate all the
new Bluetooth commands.
Bluetooth - Installing the Printer with a Windows XP
®
SP2
This process covers the printer installation for Windows XP SP2 (or above)
1.
From the Windows ‘Start’ menu, open the ‘Printers and Faxes’ window. Click on
‘Add Printer’ and a wizard will start. Click ‘Next’ when the “Welcome” window displays
to continue.
2.
Leave the ‘Local’ radio button with the ‘Automatic detect ...’ checkbox (checked) selected
and click ‘Next’.
3.
No printer should be found. If there is one or more new printers detected, then do not
select any of those printers and click ‘Next’.
4.
Select the ‘Create a new port’ radio button and select ‘Bluetooth Printer Port’ from the
associated pull down menu.
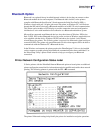
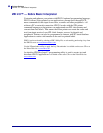
Shows Disconnected or
Connected Status