


63
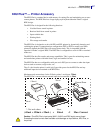
Printer Options
Bluetooth Option
8/4/10 GX420d™ / GX430d™ User Guide 980611-001 Rev. C
5.
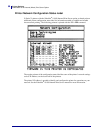
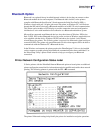
From the new ‘Bluetooth Printer Port’ window, select your printer from the Bluetooth
devices in the list. This may take several minutes. Click on the ‘Connect’ button.
6.
The ‘Install Printer Software’ window will open. Select ‘ZDesigner’ as ‘Manufacture’ to
select supported Zebra printer models, and then select your printer model in the ‘Printers’
selection. Click ‘Next’ to continue.
7.
Select ‘Keep the existing drivers’ and click ‘Next’.
8.
Name your printer and choose your default printer setting as desired. Click ‘Next’.
9.
Answer ‘Yes’, you want to print a test page. Click ‘Next’ to continue.
10.
Click ‘Finish’ on the ‘Completing the Add Printer Wizard’ window and the Bluetooth
printer will complete installation and print a Windows test print page (a Windows logo at
minimum).
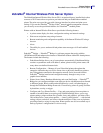
Bluetooth - Installing the Printer with a Windows Vista
®
SP2 and Windows 7
®
The Windows Vista (SP2 or higher) and Windows 7 bluetooth install differs from the XP
install.
• Windows Vista: Open the ‘Add Printer’ wizard by clicking the ‘Start’ button,
clicking ‘Control Panel’, clicking ‘Hardware and Sound’, clicking ‘Printers’, and then
clicking ‘Add a printer’.
• Windows 7: Open Devices and Printers by clicking the Start button Picture
of the Start button, and then, on the Start menu, clicking Devices and
Printers
• Some non-Microsoft Bluetooth dongles and built-in Bluetooth devices in the host
PC’s have marginal driver support for SPP printing and may not complete the ‘Add
printer’ wizard normally. You may need to go to the ‘Bluetooth Devices’ in the
‘Control Panel’ or from the system tray on the Windows ‘Start’ bar and activate SPP
for the ‘device’, your Bluetooth printer you are installing. Install the printer to a local
printer (USB or Serial Port for your G-Series printer) and then change the ‘Port’ after
the install has completed to the SPP (virtual serial port) COM port.