


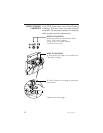
TO INSTALL THE P310 PRINTER DRIVER INTO WINDOWS 95, USE THE FOL
-
LOWING STEPS:
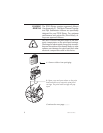
1. Start your computer and then Windows.
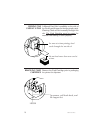
2.Inserteither theCD ROM orDiskettecontaingthe WindowsDriver intothe associated
drive.
3. Under Windows click the Start button, Select Settings, then Printers.
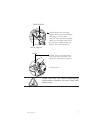
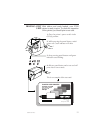
4. Double-click on the Add Printer icon. The Add Printer Wizardwill display a list of
printers. Select Have Disk and locate the P310 Drivers on the CD. For more informa
-
tionabout how to installa Windows driver please consultthe appropriate Microsoft doc
-
umentation.
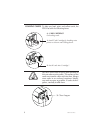
Once the printer driver has been successfully installed, you will need to configure it for
you printer. This driver provides control of several printer features when printing from
Windows applications. These features are accessed through the P310 Plastic Card
Printer Properties. To access these properties select the Zebra P310 Card Printer
icon in Printers. Then click File Menu and select Properties.
The P310 Printer screen appears. Change the options as follows:
1. On the Printer Tab configure the magnetic encoder feature. If your printer is
equipped with a Magnetic Encoder option, select With Magnetic Encoder option.
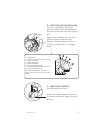
2. On the Card Tab select card orientation:
Landscape or Portrait - Select ‘Landscape.’
3. On the Ribbon Tab, select the Ribbon Type. Select YMCKO for the standard
5-panel ribbon.
4.Inthe sametab,go toBlack Panel areaandselect Text Only.Thisoption allowsthe
text printing using the Black Resin Panel from the Color Ribbon.
5. Close the Zebra P310 Printer Properties screen.
Now that you have loaded media and set up the printer driver, the P310 Printer is ready
to print.
EXAMPLE: FOLLOW THESE STEPS TO PRINT YOUR FIRST CARD:
1. Go to the Microsoft Word Software.
2. If the printer was not selected as the default printer, go to the File menu and point
Printer Setup and choose Zebra P310 Card Printer in the list. Then press Close
button.
14 980261-001 Rev.C