


ZyWALL 5/35/70 Series User’s Guide
353 Chapter 20 Certificates
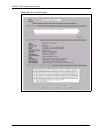
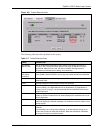
20.8 Trusted CAs
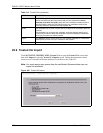
Click SECURITY, CERTIFICATES, Trusted CAs to open the Trusted CAs screen. This
screen displays a summary list of certificates of the certification authorities that you have set
the ZyWALL to accept as trusted. The ZyWALL accepts any valid certificate signed by a
certification authority on this list as being trustworthy; thus you do not need to import any
certificate that is signed by one of these certification authorities.
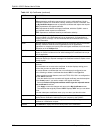
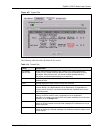
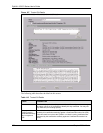
Subject Alternative
Name
This field displays the certificate owner‘s IP address (IP), domain name (DNS) or
e-mail address (EMAIL).
Key Usage This field displays for what functions the certificate’s key can be used. For
example, “DigitalSignature” means that the key can be used to sign certificates
and “KeyEncipherment” means that the key can be used to encrypt text.
Basic Constraint This field displays general information about the certificate. For example,
Subject Type=CA means that this is a certification authority’s certificate and
“Path Length Constraint=1” means that there can only be one certification
authority in the certificate’s path.
MD5 Fingerprint This is the certificate’s message digest that the ZyWALL calculated using the
MD5 algorithm.
SHA1 Fingerprint This is the certificate’s message digest that the ZyWALL calculated using the
SHA1 algorithm.
Certificate in PEM
(Base-64) Encoded
Format
This read-only text box displays the certificate or certification request in Privacy
Enhanced Mail (PEM) format. PEM uses 64 ASCII characters to convert the
binary certificate into a printable form.
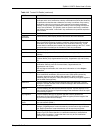
You can copy and paste a certification request into a certification authority’s web
page, an e-mail that you send to the certification authority or a text editor and
save the file on a management computer for later manual enrollment.
You can copy and paste a certificate into an e-mail to send to friends or
colleagues or you can copy and paste a certificate into a text editor and save the
file on a management computer for later distribution (via floppy disk for
example).
Export Click this button and then Save in the File Download screen. The Save As
screen opens, browse to the location that you want to use and click Save.
Apply Click Apply to save your changes back to the ZyWALL. You can only change
the name, except in the case of a self-signed certificate, which you can also set
to be the default self-signed certificate that signs the imported trusted remote
host certificates.
Cancel Click Cancel to quit and return to the My Certificates screen.
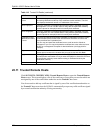
Table 113 My Certificate Details (continued)
LABEL DESCRIPTION