


Quick Installation Guide 11
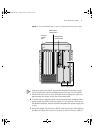
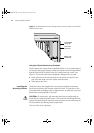
3 To help support the chassis while you install it in a rack, install the
mounting shelves that are shipped with your chassis. If you install more
than one chassis in a rack, install the bottom chassis first. Make certain
that there is sufficient space between the bottom chassis and the top
chassis to provide space for an optional cable management device.
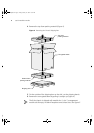
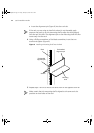
4 Position the rack-mount clips if you are going to use them for the
rack-mount installation. If you install the chassis in Metric rack slots,
install the clip nuts and screws in the closed slots of the rack-mount
flanges. If you install the chassis in Telco rack slots, position the chassis
and then install the screws and rack-mount clips in the open slots.
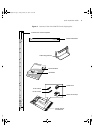
If you want to use an optional cable management device, install it above
or below the chassis (depending on which type of device you choose).
You can install the chassis in the rack either before or after you install a
cable management device.
Use the following guidelines to tighten screws to Torque Specification:
■ Faceplate thumbscrews — 5-7 in/lb (inch-pounds)
■ #10 screws for holding the chassis and mounting shelves onto the
rack rail — 22-25 in/lb
To ensure that you tighten screws to Torque Specification, use a torque
screwdriver.
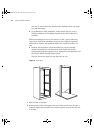
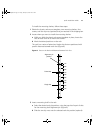
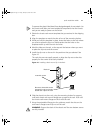
Selecting the Slot on the Rack
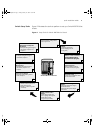
The 8-slot chassis have two slot types on the rack-mount flanges to
mount the chassis in a rack. Figure 7 shows the Telco and Metric slots and
the location of the preinstalled rack-mount flange on the 8-slot chassis.
4007RQS.book Page 11 Friday, January 25, 2002 10:27 AM