


18 Quick Installation Guide
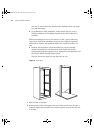
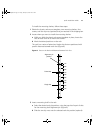
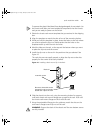
8 Secure the chassis to the rack with the screws provided (eight 10-32 inch
screws) and with the rack-mount clips.
a Install one screw on each side in the bottom slot on each rack-mount
flange.
b Allow the weight of the chassis to rest on the mounting shelves and
install the remaining screws while you continue to support the chassis.
c Tighten all screws completely.
Tighten the #10 screws that hold the chassis onto the rail to a Torque
Specification of 22-25 in/lb (inch-pounds).
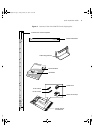
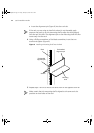
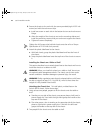
9 Attach the plastic label bezel to the chassis.
a With both hands, grasp the plastic label bezel and face the front of
the chassis.
b Snap the plastic label bezel onto the top front of the chassis to secure
it.
Installing the Chassis on a Table or Shelf
This section describes how to attach plastic feet to the chassis and how to
install the chassis on a table or a shelf.
WARNING: When you install the chassis on a table or shelf, do not use
the optional cable management device. The chassis can tip over under
certain conditions. Hardware damage or personal injury can result.
WARNING: Safety regulations state that the selected table or shelf must
be able to support at least 215.1 kg (474 lb), which is three times the
weight of a fully loaded 8-slot chassis.
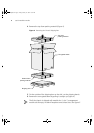
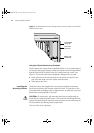
Attaching the Chassis Feet To install plastic, molded feet on the
Switch 4007R chassis, follow these steps:
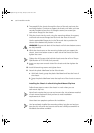
1 Using at least two people, prepare to lift the chassis onto the table or
shelf.
a Standing on one side of the chassis, one person places a left hand in
power supply slot 3 and with the right hand grasps the handle at the
top rear of the chassis.
b The other person, who is standing on the opposite side of the chassis,
places a right hand in power supply slot 1 and with the left hand
grasps the handle on the top rear of the chassis.
2 Two people lift the chassis onto the table or shelf.
4007RQS.book Page 18 Friday, January 25, 2002 10:27 AM