


16 Quick Installation Guide
6 Two people lift the chassis through the front of the rack and onto the
mounting shelves. Continue to support the chassis until after you have
securely installed at least four of the eight screws (two screws per
rack-mount flange) for the chassis.
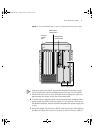
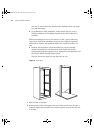
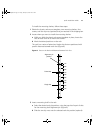
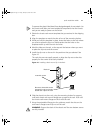
7 Slide the chassis into the rack, using the mounting shelves for support,
until both rack-mount flanges are flush with the front of the rack.
Use the preinstalled flange pins in the Telco rack slot to position the
chassis at the desired slot position in the rack.
WARNING: Support the back of the chassis until the two bottom screws
are fully inserted.
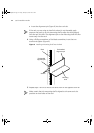
8 While the chassis rests on the mounting shelves and you support the
chassis, insert one bottom screw on each side of the chassis and then
tighten the screw.
Tighten the #10 screws that hold the chassis onto the rail to a Torque
Specification of 22-25 in/lb (inch-pounds).
9 Insert one top screw on each side of the chassis and then tighten the
screw.
10 Install all remaining screws and tighten them.
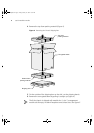
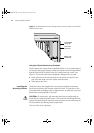
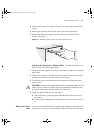
11 Attach the plastic label bezel to the 8-slot chassis.
a With both hands, grasp the plastic label bezel and face the front of
the chassis.
b Snap the plastic label bezel onto the top front of the chassis to secure
it.
Installing the Chassis in a Rack Using Rack-Mount Clip Nuts
Follow these steps to mount the chassis in a rack when you use
rack-mount clip nuts.
Not all racks require that you use rack-mount clips. Use whatever method
of rack-mount equipment that you have to meet installation
requirements in a rack.
Use at least two people to perform this installation.
You have already installed the mounting shelves into the rack and you
have the clip nuts with rack-mount screws and a Phillips screwdriver or
flat-blade screwdriver available.
4007RQS.book Page 16 Friday, January 25, 2002 10:27 AM