


Quick Installation Guide 17
To prevent the plastic label bezel from being damaged, do not attach it to
the chassis until after you have installed all components into the chassis
and you are ready to power on the Switch.
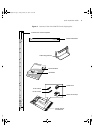
1 Obtain the chassis rack-mount template that you received in the shipping
box.
2 Align the template to match the slots of one of the mounting shelves.
3 While you hold the template in place, locate the holes on the rack where
you want to place the clip nuts. Make certain that the holes on the
template match up with the rack slot holes.
4 Mark the holes on the rack, at the top and the bottom where you want
to place the clip nuts and the screws.
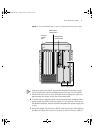
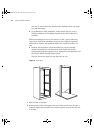
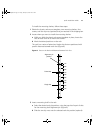
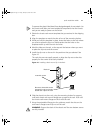
5 Install the clip nuts on the rack in the positions that you selected. See
Figure 10.
The rack slots are not equally spaced, so align the clip nuts to the slots
properly for the screws to be easily installed.
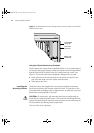
Figure 10 Installing a Rack-mount Clip in the Rack
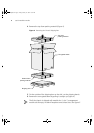
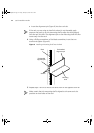
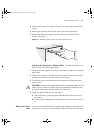
6 Slide the chassis into the rack, using the mounting shelves for support,
until both chassis rack-mount flanges are up against the rack. Push until
the chassis rack-mount flanges are flush with the rack.
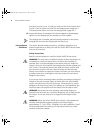
7 Using the preinstalled flange pins for guidance, match the slots on the
rack-mount flange to each clip nut on the rack.
WARNING: Support the back of the chassis until the two bottom screws
are fully inserted.
10-32 inch screw
Rack rail
Be sure to thread the screw
through this nut to securely
attach each clip to the rack
Top view
4007RQS.book Page 17 Friday, January 25, 2002 10:27 AM