


Quick Installation Guide 15
Installing the Chassis This section describes how to install the chassis:
■ In a rack without clip nuts
■ In a rack with clip nuts
■ On a table or a shelf
You may have other types of racks at your site. Follow the manufacturer’s
suggested installation procedures.
Before you begin, examine the rack to determine if you need to use clip
nuts in this installation.
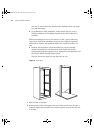
Installing the Chassis in a Rack Without Clip Nuts
Follow these steps to mount the 8-slot chassis in a rack. Use at least two
people to perform this installation.
You have already installed the mounting shelves into the rack and you
have the rack-mount screws and a Phillips screwdriver or flat-blade
screwdriver available.
To prevent the plastic label bezel from being damaged, do not attach it to
the chassis until after you have installed all components into the chassis
and you are ready to power on the Switch.
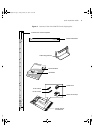
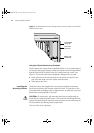
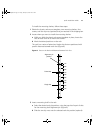
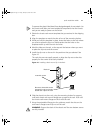
1 Obtain the chassis rack-mount template that you received in the shipping
box.
2 Align the template to match the slots of one of the mounting shelves.
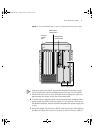
3 While you hold the template in place, locate the holes on the rack where
you want to place the chassis. Make certain that the holes on the
template match up with the rack slot holes.
4 Locate and mark the holes on the rack, at the top and the bottom where
you want to place the chassis and the screws.
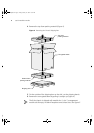
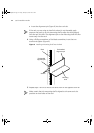
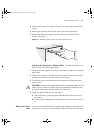
5 Prepare to lift the chassis.
a Standing on one side of the chassis, one person places a left hand in
power supply slot 3 and with the right hand grasps the handle at the
top rear of the chassis.
b The other person, who is standing on the opposite side of the chassis,
places a right hand in power supply slot 1 and with the left hand
grasps the handle on the top rear of the chassis.
4007RQS.book Page 15 Friday, January 25, 2002 10:27 AM