


4 Quick Installation Guide
Unpacking
Instructions
Follow these steps:
1 Place the chassis shipping box near the rack, the table, or the shelf where
you plan to install the chassis.
WARNING: Safety regulations state that the selected table, shelf, or rack
must be able to support at least three times the weight of a fully loaded
chassis.
■ A fully loaded 8-slot chassis weighs approximately 71.7 kg (158 lb).
Therefore, the selected table, shelf, or rack must support at least
215.1 kg (474 lb).
2 Cut the tape that covers the seam on the top of the box.
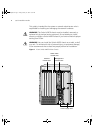
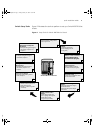
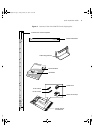
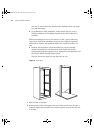
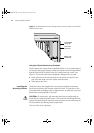
3 Remove the following items (Figure 3) from the top of the shipping box:
■ One hardware kit in a plastic bag (Part Number 10002489 16SL HDW)
■ Four plastic feet to mount to the bottom of the chassis (for a
tabletop installation)
■ Four 6-32 Phillips-head screws to mount the feet
■ Twelve rack-mount clips for a rack-mount installation
■ Twelve 10-32 Phillips-head screws to attach the chassis to the rack
■ One plastic label bezel to snap into the top front of the 8-slot chassis
NOTE: To prevent the plastic label bezel from being damaged, do not
attach it to the chassis until after you have installed all components into
the chassis and you are ready to power on the Switch.
■ Two universal mounting shelves (brackets)
■ One documentation kit that contains:
■ Documentation CD-ROM
■ Chassis Quick Installation Guide for the Switch 4007R 8-slot
Chassis
■ Switch 4007R Getting Started Guide
■ Switch 4007 Web Management User Guide
■ Power Supply Installation Guide for the Switch 4007R
4007RQS.book Page 4 Friday, January 25, 2002 10:27 AM