


84 CHAPTER 6: SWITCH MONITORING AND MAINTENANCE
Removing and Cleaning the Chassis’s Air Filter
1 Unscrew the screws at the top and bottom of the air filter with a flathead
screwdriver.
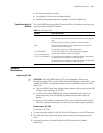
2 Hold the air filter at the left-rear by its upper and lower edges, pull part of it out of
the chassis, put one hand underneath the air filter to hold it, and pull it out slowly
along the guides.
c
CAUTION: Because the air filter is rather long, you should hold its front end with
one hand, and bear its weight by putting another hand underneath it when sliding
the air filter out of the chassis.
3 Rather than taking the air filter mesh out, directly wash the air filter after removing
it from the chassis, allow it to air dry, and insert it back into the chassis.
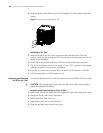
Installing the Chassis’s Air Filter
1 Hold the front end of the air filter with one hand and put the other hand
underneath it, align it with the guides, and slide it into the chassis along the
guides.
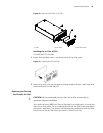
2 Fix the air filter by fastening the screws at the top and bottom of the air filter with
a flathead screwdriver.
c
CAUTION: As the air filter is rather long, you should hold its front end with one
hand, and bear its weight by putting another hand underneath it when sliding the
air filter into the chassis.
Replacing a Module The Switch 8800’s fabric, I/O modules, and application modules are similar in
structure and you can install and remove them in the same way. This section
describes the general procedures for removing and installing these modules.
The Switch 8800 Family modules are hot-swappable.
Required tools
■ ESD-preventive wrist strap
■ Screwdriver
Removing a Module
To remove a module:
1 Wear the ESD-preventive wrist strap and unscrew the screws on the module with a
flathead screwdriver.
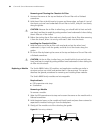
2 Hold the ejector levers on the module with both hands and press them outward to
separate the module’s locking pin from the backplane.
3 Gently pull the module out of the slot along the guides.
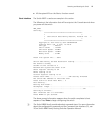
Figure 60 Removing a Module