


A
LIGHTNING PROTECTION OF THE
SWITCH
Installing a Lightning
Arrester for the AC
Power
This appendix describes how to install the lightning arrester for the AC power (a
socket strip with lightning protection)
c
CAUTION: A lightning arrester is not shipped with the switch. You must purchase
it separately, if needed.
Make sure, when connecting an outdoor AC power cord directly to the switch,
that you connect a lightning arrester to the AC power (a socket strip with
lightning protection) before you plug the AC power cord into the switch. This
helps to prevent damage in the event of a lightning strike. Install your lightening
arrester according to its manufacturer’s instructions.
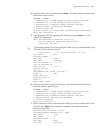
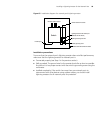
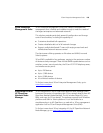
Figure 64 A Lightning Arrester
c
CAUTION:
■ Make sure that the arrester is well grounded before using the lightning arrester
for power.
■ After inserting the switch’s AC power cord plug into the lightening arrester’s
socket, if the green LED is on and the red LED does not alarm, it means that the
lightning arrester’s power is running and the lightning protection function is
active.
■ Make sure that the red LED is on. If there is a problem, determine if the
arrester’s ground wire is well grounded and the live and zero wires are
Mainboard
Grounding and polarity indicator (red) :
On means that the lines are incorrectly connected
( either the ground wire is not well connected, or the live and zero lines are incorrectly connected).
Check the power supply circuit.
Power switch
Normal operation indicator (green):
On means that the arrester is working. Otherwise, it
means that the protection circuit has been damaged.
Multipurpose power socket connected to the device
protected by the arrester
Power socket (compliant with the IEC standard),
connected to the equipment room’s power supply
through power cord
Overload auto protector,
which can be manually reset.