


ENGLISH
11
3M 1997
3M
Multimedia Projector MP8660
Section 4: Operating the Projector
4-1. Turning On the Projector
Read the Important Safeguards before operating the MP8660 projector.
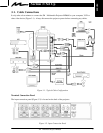
Refer to Section 3 to make all cable connections. When the input cables and power cords are connected, turn
on the projector power then the power to the input sources.
!
Caution
Allow a projector that has been stored in a cold
environment to warm up to operating temperature
0C to 35C (32F to 95F) before applying power.
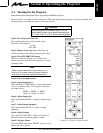
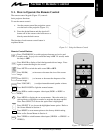
Step 1: Turn Projector Power On.
Turn on the main power switch located on the
backside of the projector.
| = ON
O = OFF
Step 2: Remove Lens Cap. Remove the lens cap
from the projection lens before energizing the lamp.
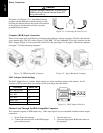
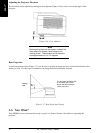
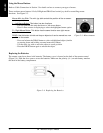
Step 3: Press STANDBY/ON button.
The Power indicator (Figure 4-1) will turn from
amber to green to indicate that the projector is in the
operating mode.
Note
When a metal halide lamp is first turned on, it is
normal for it to make noise as the gas inside the
bulb heats to the proper operating temperature.
Step 4: Power up input sources.
Step 5: Select Input Source.
Press the RGB or VIDEO button to select the desired
video or computer source. Press again to select the
next input source.
RGB1 ⇒ RGB2 ⇒ RGB1
Video1 ⇒ Video2 ⇒ Video1
Step 6: Adjust Image Size
Press and hold the ZOOM +/– button to adjust image
size.
Step 7: Adjust Image sharpness
Press and hold the FOCUS +/– button to adjust
sharpness.
Step 8: Adjust Volume
Press and hold VOLUME +/– button to increase or
decrease internal or external speaker volume.
Step 9: Navigate Menus.
Press the MENU button and SELECT arrows to view
menus and select options.
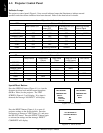
Figure 4-1. Projector Control Panel