


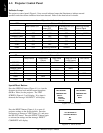


ENGLISH
20
3M 1997
3M
Multimedia Projector MP8660
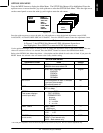
6-2. MP8660 Lamp Replacement
To replace the lamp on the 3MMP8660 Multimedia Projector, you will need the following:
2.5 mm hex wrench (shipped with replacement lamp module)
Metal halide lamp 78-6969-8460-4
!
Caution
Lamp and adjacent metal parts become extremely hot and can cause burns to your
fingers. Allow the projector to cool for at least 1 hour before replacing the lamp.
!
Caution
Do not touch the inside of the lamp glass with your fingers. Oil from your fingers can
contaminate the lamp glass and cause it to crack or burst.
!
Caution
Use care when inserting or removing the lamp module from the projector. Excessive
force can cause damage to the lamp or projector.
1. Power OFF: Press the Standby/ON button and wait for the fan motor to cycle off. Then, turn off the power switch
and UNPLUG THE POWER CORD.
2. Allow projector to cool: If the projector is at operating temperature, wait one hour to allow the metal parts to cool
before continuing.
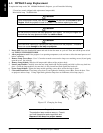
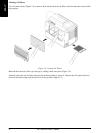
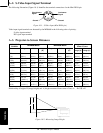
3. Remove Lamp Access Door: Use a 2.5 mm hex wrench to unscrew the lamp cover retaining screws (1) and gently
open the cover. Set aside (2).
4. Remove Lamp Module: Slide the old lamp module (4) out of the projector body.
5. Insert Lamp Module: Carefully insert the new lamp module (5) into the opening and slide it all the way back into
place. Check the lamp module to be sure that it is fully inserted and flush against the back wall.
6. Secure Lamp Module: Tighten the lamp module retaining screws (6) to secure the lamp in place.
7. Close and Secure Door: Close lamp access door (7) and tighten the retaining screws (8) to secure the door. Turn
on projector and test lamp. If lamp light blinks green but lamp does not illuminate, reseat lamp (step 6).
1
2
3
4
5
67
8
Figure 6-2. Changing the Lamp
Important
The projection lamp contains mercury. Consult
your local hazardous waste regualtions and
dispose of this lamp in a proper manner.