


41
Chapter 3 System Disassembling and Replacement
Main Unit Disassembling
Tool : Screw Driver --Hex (#4-40) and Cross(Mechanical : M3,M4, Opt.Engine :M2)
Process :
Step Description Tool
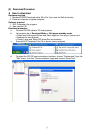
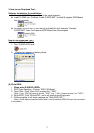
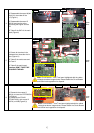
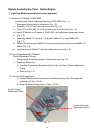
1
(1) Disassemble the
screw*5(M3*L8) in the lowercase
and screw*2 (M2.5*L10) in the
inlet and outlet case.
(2) Take off the lamp-door.
screw
driver
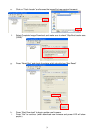
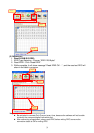
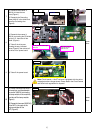
2
(1) Disassemble the screw*3
(M3*L6) connecting the U/C with
the machine(you may need to
disclose the film on the upper
case).
(2) Hit the inlet-case to loose the
hook and at the same time lift the
upper case.
screw
driver
1
5
2
4
3
1
2
3
Hook in U/C
Hit the inlet case to
loose the hook
at the same
time lift the
upper case
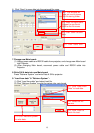
3
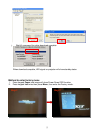
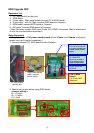
(1) Untie the tie in the engine and
loose the wire in it.(Figure1)
(2) Disassemble the screw*1
(M3*L8) connecting the F/C with
the L/C.(Figure2)
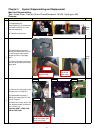
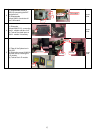
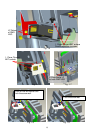
(3) Extract the I/R 3pin wire in the
main board and take off the front
case. (Figure 3,4)
Attention :DON'T TOUCH OR
BREAK THE LENS.
Figure1
Figure2
IR 3pin Wire
Figure3
Notice: Please release
the IR wire before take
off the Front Case.
Figure4