


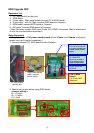


44
11
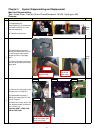
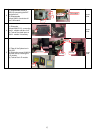
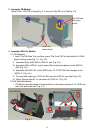
(1) Disassemble the screw*3
(M2.5*L10), then take off the
engine. (Figure1)
(2) Disassemble the screw*2
(M3*L8) and take off BKT under
the engine. (Figure2)
screw
driver
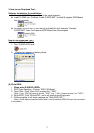
12
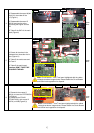
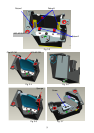
(1) Take off the ballast mylar
(Figure1)
(2) Extract all the wire in the
ballast and the Dismantle the
screw*2(M3*L6), then take off the
ballast.(Figure2)
(3) Dismantle screw*2 (M3*L6)
connecting the blower with the
machine and take off the the
blower.(Figure3)
(4) Dismantle screw*3 (M3*L8)
connecting the lamp box with the
machine and take off the
lampbox.(Figure4)
screw
driver
2
1
3
Figure1
1
2
3
2
1
Figure2
Figure3
Figure4
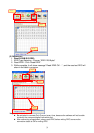
Figure1
Figure2
1
2
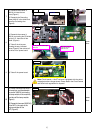
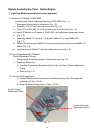
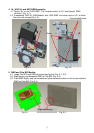
Note:
Circuit boards > 10cm
2
has been highlighted with the yellow
rectangle as above image shows. Please detach the Circuit boards
and follow local regulations for disposal.
Step Discription
Tool
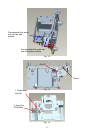
1
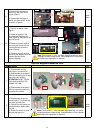
(1) Disassemble the ring
focus.(pull it out with force.)
(2) Disassemble the screws*3
(M3*L6) connecting the len and
take off the len carefully.
ATTENTION:
DON'T TOUCH
THE LEN'S SURFACE OR
BREAK THE LEN.
(3) Disassemble the screws*3
(M3*L4) connecting the frame
and take off the frame.
screw
driver
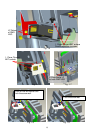
2
(1) Disassemble the spring
screws*4(M3*L7.5) connecting
the Hsink and take it off.
(2) Take off the chip under the
Heatsink and the baffle under
the chip.
(3) Rotate the switch to loose
the chip and take it off.
screw
driver
Optical Engine Dismantle SOP
1
3
2
3
PULL
2
1
4
3
Note:
Circuit boards > 10cm
2
has been highlighted with the yellow
rectangle as above image shows. Please detach the Circuit boards
and follow local regulations for disposal.