3-4
DuraLAN Fast Ethernet NICs User’s Guide
Installing the DuraLAN NIC
WARNING: Before you begin, turn O
FF
power to the PC, and
disconnect the power cord!
1
Ground yourself by touching an unpainted surface of the PC
case.
2
Remove the cover from your computer. Refer to the
manufacturer’s documentation for help.
3
Locate an unused PCI expansion slot.
– For best performance, install the 64-bit DuraLAN NIC in a 64-bit
PCI expansion slot. (32-bit PCI expansion slots may be used also.)
– Some noncompliant 32-bit PCI expansion slots do not support
64-bit NICs. This is because the slot’s outside notch is not deep
enough to allow the bus contacts to fit around the slot. If the 64-bit
DuraLAN NIC does not fit in the slot, please return to your
purchase location for replacement with a 32-bit DuraLAN NIC.
4
Unscrew the bracket screw, and then remove the expansion
slot bracket cover.
Note: PCI slots and NICs come in two varieties: 3.3-volt,
and the more common 5-volt. All Adaptec PCI NICs support
5-volt and 3.3-volt slots.
5
Carefully remove the DuraLAN NIC from its antistatic
container.
6
Verify the model name on the NIC (such as, ANA-69011/TX,
ANA-62011/TX, etc.).
7
Check the NIC for any visible signs of damage which may
have occurred during shipment. If you find a problem,
immediately notify your network supplier and the shipping
service which delivered your NIC.
8
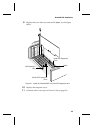
Insert the NIC into the expansion slot, pressing down firmly
until the bus contacts are seated in the slot.


