


18
Operation
In operation, the AdderLink AV modules are designed to be completely
transparent - high quality video and audio from the source PC system are played
as normal, the only difference is that they are now being seen and heard up to
300 metres away.
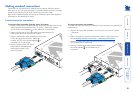
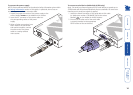
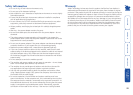
Indicators
All AdderLink AV modules are
equipped with two indicators to
conrm operation and, if necessary,
assist with quick troubleshooting of
potential problems.
The indicators are located on one of
the end panels, near to the LINK port and
operate as follows:
• RED When lit*, indicates the
presence of power into the module,
• GREEN When lit, indicates the
presence of a video input into the
module.
LINK
OU
T
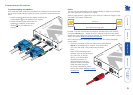
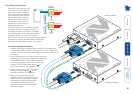
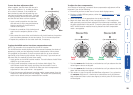
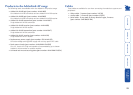
Brightness and sharpness adjustments
The brightness and sharpness adjustments
provided on every AdderLink AV receiver allow
you to compensate for any losses incurred
within long cable links. These two adjustments
can be made in any order and independently
of each other.
When making adjustments it is necessary to
have access to the AdderLink AV receiver and
to be able to view one or both connected
display screens. Both adjustments, sharpness
in particular, are made easier when viewing
high contrast images with vertical edges, such
as black lines on a white background.
NOTE: Both video outputs are equally affected by your brightness and/or
sharpness adjustments.
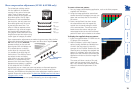
To display a suitable high contrast image
• Open a word processor, type the capital
letter ‘H’, or ‘M’ and increase the point
size to 72 or higher. For best results, the
background should be white and the
character should be black.
• A BLACK shadow on the right of the
character indicates UNDER compensation.
• A WHITE shadow on the right of the
character indicates OVER compensation.
B
R
IG
H
T
S
H
A
R
P
ADDERLINK
Sharpness dial
Brightness dial
High contrast
black character
on white
background
Black or bright
white shadow
on the right
indicates the need
for sharpness
adjustment
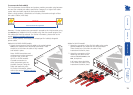
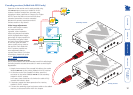
Adjustments
Video signals are susceptible to the effects of long distance cables and for
this reason, every AdderLink AV receiver includes brightness and sharpness
adjustment dials. Additionally, the AdderLink AV101 and AV200 receivers are
also equipped with two extra dials to eliminate the effects of colour skew within
the video image.
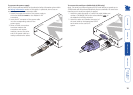
To adjust brightness and/or sharpness
1 Carefully insert a small screwdriver into the dial labelled BRIGHT or SHARP, as
appropriate.
2 Slowly turn the dial clockwise or anticlockwise and observe the effect shown
on the screen. Withdraw the screwdriver when the displayed image is shown
at its optimum clarity.
3 If necessary, repeat step 2 for the other dial.
SECT 4
* AV200 receiver only - The RED indicator has additional functions:
• Fast ickering - module recently powered on and in temporary
intermediate state.
• Slow ash (every second) - module is in skew compensation mode
(see Skew compensation adjustments for details).
• Continually lit - module is operating normally with its serial ports
enabled.