


NetVanta 3200/3300/3400 Series Unit Installation
61200860L1-34AB Copyright © 2012 ADTRAN, Inc. 63
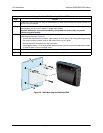
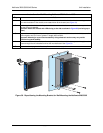
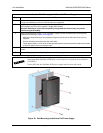
Wall Mounting NetVanta 3200/3300/3400 Series
The NetVanta 3200/3300/3400 Series units can be wall mounted. By following these instructions exactly,
the NetVanta can be safely mounted to the wall.
The rackmount kit for the NetVanta 3448 is not included in shipments of these products.
You must order the rackmount kit (P/N 1200827E1) separately.
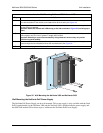
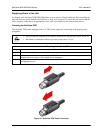
Instructions for Rack Mounting the NetVanta 3205, NetVanta 3305, NetVanta 3430, NetVanta 3448,
NetVanta 3450, and NetVanta 3458
Step Action
1
To allow proper grounding, scrape the paint from the rack around the mounting holes where the NetVanta
will be positioned.
2
Position the NetVanta in a stationary equipment rack. Allow 1-inch of clearance between units.
3
Have an assistant hold the unit in position as you install two mounting bolts through the unit’s brackets and
into the equipment rack using a #2 phillips-head screwdriver.
4
Proceed to the steps given in Supplying Power to the Unit on page 69.
• NetVanta units are to be installed only by qualified service personnel.
• To avoid damaging the unit, use only the screws included in the shipment when
attaching mounting ears to the chassis.
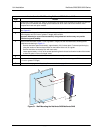
• Wall mounting of the equipment should be such that the amount of air flow required for
safe operation of the equipment is not compromised. Allow 1-inch clearance on the top
and sides of the unit for sufficient air flow.
• When wall mounting the NetVanta, care must be taken not to damage the power cord.
Do not attach the power cord to the building surface or run it through walls, ceilings,
floors, or openings in the building structure.
• The socket-outlet must be installed near the equipment and must be easily accessible.