4
The array coefficients are computed by measuring
a set of “known” devices connected at a fixed point
and solving as the vector difference between the
modeled and measured response.
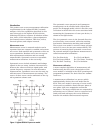
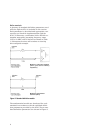
The full 2-port error model shown in Figure 1 is
an example of only one of the measurement calibra-
tions available with the 8510. The measurement
calibration process for the 8510 must be one of
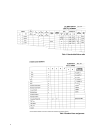
seven types: RESPONSE, RESPONSE & ISOLATION,
S
ll
1-PORT, S
22
1-PORT, ONE PATH 2-PORT, FULL
2-PORT, and TRL 2-PORT. Each of these calibration
types solves for a different set of the systematic
measurement errors. A RESPONSE calibration
solves for the systematic error term for reflec-
tion or transmission tracking depending on the
S-parameter which is activated on the 8510 at the
time. RESPONSE & ISOLATION adds correction
for crosstalk to a simple RESPONSE calibration.
An S
11
l-PORT calibration solves for the forward
error terms, directivity, source match and reflec-
tion tracking. Likewise, the S
22
1-PORT calibration
solves for the same error terms in the reverse
direction. A ONE PATH 2-PORT calibration solves
for all the forward error terms. FULL 2-PORT and
TRL 2-PORT calibrations include both forward and
reverse error terms.
The type of measurement calibration selected by
the user depends on the device to be measured
(i.e., 1-port or 2-port device) and the extent of
accuracy enhancement desired. Further, a combi-
nation of calibrations can be used in the measure-
ment of a particular device.
The accuracy of subsequent test device measure-
ments is dependent on the accuracy of the test
equipment, how well the “known” devices are mod-
eled and the exactness of the error correction
model.
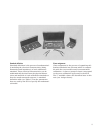
Calibration kit
A calibration kit is a set of physical devices called
standards. Each standard has a precisely known or
predictable magnitude and phase response as a
function of frequency. In order for the 8510 to use
the standards of a calibration kit, the response of
each standard must be mathematically defined and
then organized into standard classes which corre-
spond to the error models used by the 8510.
Agilent currently supplies calibration kits with
1.0-mm (85059A), 1.85-mm (85058D), 2.4-mm
(85056A/D/K), 3.5-mm (85052A/B/C/D/E), 7-mm
(85050B/C/D) and Type-N (85054B) coaxial con-
nectors. To be able to use a particular calibration
kit, the known characteristics from each standard
in the kit must be entered into the 8510 non-
volatile memory. The operating and service manu-
als for each of the Agilent calibration kits contain
the physical characteristics for each standard in
the kit and mathematical definitions in the format
required by the 8510.
Waveguide calibration using the 8510 is possible.
Calibration in microstrip and other non-coaxial
media is described in Agilent Product Note 8510-8A.


