


NetLinx Security and Web Server
90
NetLinx Integrated Controllers
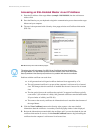
18. The first tab displayed within your open browser window is WebControl.
Using your NetLinx Master to control the G4 panel
Refer to the specific panel instruction manual for detailed information on configuring and enabling
WebControl.
Once the Master’s IP Address has been set through NetLinx Studio (version 2.2 or higher):
1. Launch your web browser.
2. Enter the IP Address of the target NetLinx Master (example: 198.198.99.99) into your web
browser’s Address field.
3. Enter a valid user name and password into the fields within the Enter Network Password
dialog.
4. Click OK to enter the information and proceed to the Master’s WebControl tab.
5. Press the Enter key on your keyboard to begin the communication process between the target
Master and your PC.
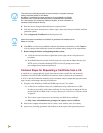
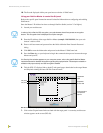
6. This tab (FIG. 35) displays links to both G3 web panel pages downloaded to the target Master
and G4 panels running the latest G4 Web Control feature.
7. Click on the G4 panel name link associated with the target panel. A secondary web browser
window appears on the screen (FIG. 60).
In order to fully utilize the SSL encryption, your web browser should incorporate an encryption
feature. This encryption level is displayed as a Cipher strength.
If a Security Alert window appears on your computer screen, refer to the specific NetLinx Master
Instruction Manual for detailed information regarding this popup window. These steps are based on
a Master with proper security and SSL encryption enabled.
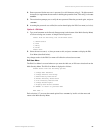
FIG. 59 WebControl Tab (populated with panels)
Compatible
devices field
Communication
compression
options
G3 panel
G4 panel
Application
tabs