


IPS 1000 Series VoIP Gateway
14
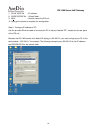
9. Installation and Configuration
After preparing the information you need as specified in section 5, follow the following steps to do the
basic configuration. You can use either a telephone or a system console to perform basic configurations.
It is simple to connect a telephone set to FXS port and configures the system. If you want to use system
console to configure the system (Only 1004/1008/1016 support), you have to configure your VT100
terminal to match the settings of the IPS unit’s console port. The console port’s terminal connection is
set to 9600 baud, 8 data bits, 1 stop bit and no parity. Turn on the IPS unit’s power and wait for the
terminal to display “Press Enter…” follow the directions to begin.
Here are several procedures to do:
1. Confirming the Region ID.
2. Configure IP address of gateway.
3. Enter into the WEB page.
4. Plan and configure the channels into SIP entity.
5. Configure SIP proxy and register information.
6. Configure SIP entity information.
7. Configure Outbound Authentication (If needs).
8. Configure STUN (If your gateway is behind NAT).
9. Check the SIP entity if is registered successful.
10. Configure Phone book (If needs)
11. Make a SIP call.
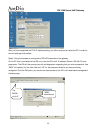
9.1. Confirming the Region ID
Skip this step if you are installing your IPS unit in the default region. The default Region ID is printed on
the label located outside the box. If you are installing your IPS unit at any region other then the region ID
specified on the label, you will then need to configure the IPS to the correct Region ID.
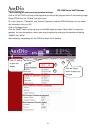
9.1.1. Phone Setting
1. Connect the power.
2. Connect the phone cable to the “Phone” socket on the rear panel as pictured above.
3. When the CPU/ACT LED is on, pick up the handset and listen for the dialing tone.
4. Dial “##0000” and listen for 3 short beep.