


ExpertNet Lite Assessment Tool - User Guide
15
Install and Configure the Avaya Traffic
Simulator
Installing the Avaya traffic Simulator
Install the Avaya Traffic Simulator on each remote endpoint you want to test. Each
remote endpoint MUST be on the same Voice VLAN on which the VoIP equipment will
be eventually installed. Each Traffic Simulator will take approximately 2 minutes to
install.
See Appendix A: Installing the Controller and Test Agents
for information on installing
the test agents.
Configuring the Avaya Traffic Simulator
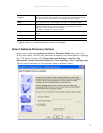
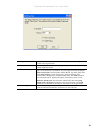
When you restart the PC after installing the Traffic Simulator, the application icon will
display in your taskbar. The icon displays in red if the tool is not running and in green
if it is. Configure the test agent using the following process:
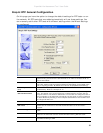
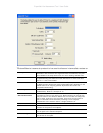
1. Double-click the icon in the task bar.
2. Ensure the IP address in the ExpertNet Controller field is the IP address of the
PC with the controller installed.
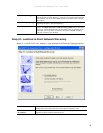
3. In the Local Command Port field, enter the port number that will be used to
receive commands. This value should match the Command Port value in step 7
of the ELAT Configuration Wizard and should not be changed unless required by
the network or firewall configuration.
4. Adjust the log level as appropriate for your needs. Setting this value to max may
have an adverse effect on the accuracy of results. Setting it to max would only be
required whenever there is a problem that requires debugging by support
engineers for ELAT.
5. Click OK.
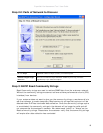
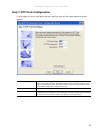
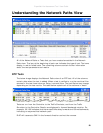
When the test agents are configured thay should autmatically register with the
Controller. An RTP test will be automatically created for each end-point. These will
display in the network Paths View. This will be explained in detail in the next
section.