


8. Installation Mode
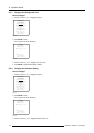
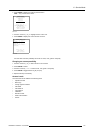
3. Push the cursor key ↑ or ↓ to highlight Highlighted item color.
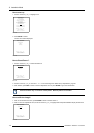
OSD
HIGHLIGHT ITEM COLOR [red]
MENU POSITION [Default]
Select with ↑ or ↓
then <ENTER>
<EXIT> to return
Menu 8-33
4. Press ENTER to toggle between Yellow, Red and Blue.
8.11.2 Menu Position
How to change
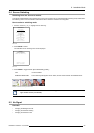
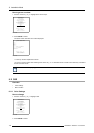
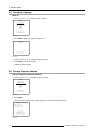
1. Push the cursor key ↑ or ↓ to highlight OSD.
INSTALLATION
INPUT SLOTS
800 PERIPHERAL
SOURCE SWITCHING
NO SIGNAL
CONTRAST ENHANCEMENT
CONVERGENCE
CONFIGURATION
LENS
QUICK ACCESS KEYS
OSD
INTERNAL PATTERNS
Select with ↑ or ↓
then <ENTER>
<EXIT> to return
Menu 8-34
2. Press ENTER to select.
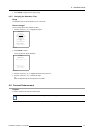
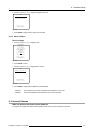
3. Push the cursor key ↑ or ↓ to highlight Menu Position.
OSD
HIGHLIGHT ITEM COLOR [red]
MENU POSITION [Default]
Select with ↑ or ↓
then <ENTER>
<EXIT> to return
Menu 8-35
4. Press ENTER to toggle between [DEFAULT] and [CENTER].
DEFAULT menus displayed in the center, adjustment boxes displayed in the corner.
CENTER menus and adjustment boxes displayed in the center of t
he image.
8.12 Internal Patterns
What can be done with these internal patterns?
The projector is equipped with different internal patterns which can be used for measurement purposes.
R5976654 SLM R12+ 27/01/2005
107