


9. Service Mode
3. Push the cursor key ↑ or ↓ to highlight Projector a ddress .
4. Press ENTER to activate.
The first digit will be highlighted.
5. Reprogram the address with ↑,↓,←,→ keys
Use the ↑ or ↓ key to select a new value, use the ← or → key to select a new digit.
Or,
use the numeric keys on the RCU to enter the new address.
The address must be between 0 and 9 when controlling the projector with the RCU or
between 0 and 255 when controlling the projector via RS232.
How to change the common address
1. Push the cursor key ↑ or ↓ to highlight Change Proj Address.
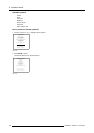
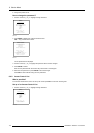
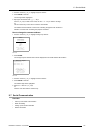
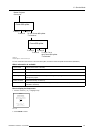
SERVICE
IDENTIFICATION
CHANGE PASSWORD
CHANGE LANGUAGE
CHANGE PROJ. ADDRESS
SERIAL COMMUNICATION
NETWORK
LAMP
DIMMING
MORE...
Select with ↑ or ↓
then <ENTER>
<EXIT> to return
Menu 9-15
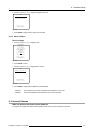
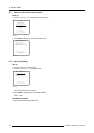
2. Press ENTER.
The Change Projector Address menu will be displayed and the actual address will be filled in.
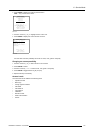
CHANGE PROJ. ADDRESS
PROJECTOR ADDRESS 1
COMMON ADDRESS (RC5) 0
COMMON ADDRESS (PPM) 0
Select with ↑ or ↓
then <ENTER>
Reprogram with ↑,↓,←,→
or numeric keys
<ENTER> to confirm
<EXIT> to return.
Menu 9-16
3. Push the cursor key ↑ or ↓ to highlight Common address.
4. Press ENTER to activate.
The address digit will be highlighted.
5. Select 0 or 1 with the ↑ or ↓ keys
Or,
enter the new value with the numeric keys.
9.7 Serial Communication
Overview
• Start Up of the Serial Communication
• Baud rate Setting
• Setting up the Interface Standard
• RS422 Termination
R5976654 SLM R12+ 27/01/2005
115