


10
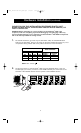
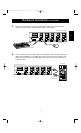
Hardware Installation (continued)
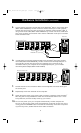
• RESET the MASTER unit by pressing the BANK/SCAN and CHANNEL buttons simultaneously
or by initiating the “Hot” key command [SCROLL LOCK], [SCROLL LOCK], [END]. This is
necessary for the MASTER unit to detect the newly added slave unit.
• Verify that the MASTER unit has detected the new slave by pressing the BANK/SCAN
button. If it detected the new slave properly, the LED display on the MASTER will register
the slave units bank address. If you have many slave units, you may have to press the
BANK/SCAN button many times to cycle through all of the preexisting slave units before
reaching the newly added unit.
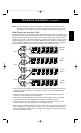
• Now you can power up the computers connected to the newly added slave unit. After all the
computers have booted up, you may need to RESET the MASTER unit again to detect the
presence of powered computers on the new slave unit.
NOTE: The OmniView
™
PRO can also be daisy-chained to OmniView
™
SE units (F1D102 and
F1D104 only) or other OmniView
™
PRO (8-Port) units. This gives the user more
selection and flexibility. When doing this, it is desirable to have the OmniView
™
PRO as
the MASTER unit because of the On-Screen Display (OSD) menu feature. Thus, all the
units will benefit from the OSD control, even if the OmniView
™
SE does not have the
OSD feature.
P72895_F1D104-OSD-univ_man.qxd 7/16/01 3:24 PM Page 10