


USER GUIDE FOR MAC
®
USERS
CHOOSING AN APPLICATION
The software loads a profile based on the settings and the currently
running application. If no profile exists for the current application, the
software uses the “Global Settings” profile. The Global Settings profile
applies to all applications that do not have a profile specifically
assigned to them.
Profiles
A profile is a mapped set of button-presses on the controller that
accomplishes various actions. Some examples of the types of actions
you can program are:
• Single Key—make a button on the controller work like a
keyboard key.
• Macros—record a sequence of keyboard keys to be played back
when a button is pressed.
• Three shift modes—the controller can have three shift buttons that
quadruple the number of functions that can be programmed into the
other buttons.
• Mouse—the game controller can be programmed to insert
mouse clicks.
See the “Tutorial” section for a walk-through creating a profile. See the
“Interface Reference” section for a description of the interface and its
functionality.
TUTORIAL
Building a Simple Profile
We will walk through a simple example of how to use the tool to create
profiles using Nostromo Array Programming Software (NAPS).
Note: This example does not cover every feature of the software. You
can find more information in the “Main Interface” section.
Note: All screen shots are from the Mac OS X version of the software.
The interface is the same in Mac OS 9 and the controls are in the
same places.
Start the Nostromo Array Programming Software Application
On Mac OS X, this is installed into your applications directory; in Mac OS
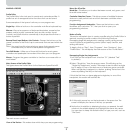
9, this is in your Control Panels menu. This will display the Main Screen
of NAPS.
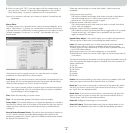
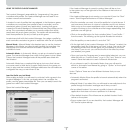
Select an Application
The “Target” pop-up menu determines which profile applies to which
application.
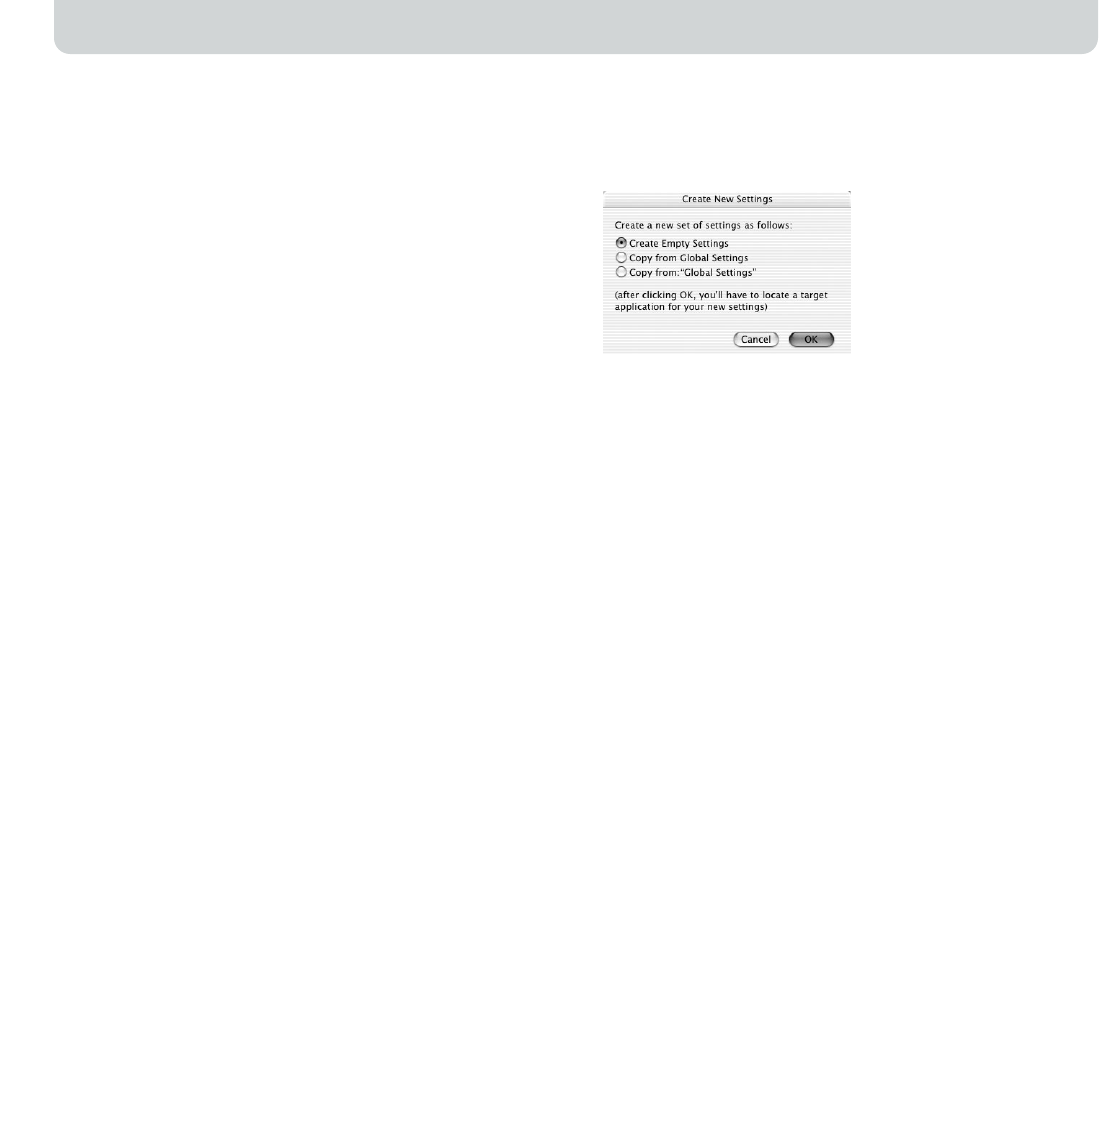
1. Select “New Settings…” from the “Target” pop-up; a dialog will
appear asking what to use as the base setting.
2. Select “Create Empty Settings” to start with a blank slate.
The Nostromo Array Panel will bring up a standard file chooser. In Mac
OS X, find and select “TextEdit” in your Applications folder. In Mac OS 9,
find and select “SimpleText”.
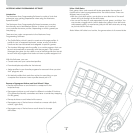
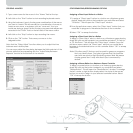
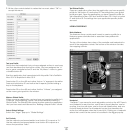
Assign a Single Key Event
1. Click on the Button 01 hardpoint or press button 01 on the controller.
This will change the “Trigger” pop-up to “Button 01”. The “Trigger”
pop-up indicates which button on the controller we are assigning the
action to.
2. The “Action” pop-up is set to “Type Keystroke” by default. This
indicates that we want the controller to simulate a keyboard
key-press when we hit the control listed in “Trigger”. This is correct.
3. Click in the “Keystroke” area. The Control Panel will highlight this box
and wait for you to press a key. Press “a”.
4. The “Frequency” pop-up determines how that key acts. The default is
“Hold Down”. Hold Down indicates that the key will be held as long
as you hold the button on the controller. This is correct.
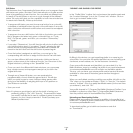
Assign a Macro
A macro is a series of keystrokes that get played back when the
triggering controller button is pressed.
1. Click on the Button 02 hardpoint or press button 02 on the controller.
This will change the “Trigger” pop-up to “Button 02”.
2. Change the “Action” pop-up to “Run Macro”.
3. In the “Macro” pop-up, select “New Macro…”. This will bring up the
“Edit Macro” dialog.
4. Enter “My Macro” as the name for this macro.
5. Tab to the first “Keystroke” edit control.
6. Type “hi there”. These keys will be filled in the various keystroke boxes.
If you make a mistake, hit the “Clear” button and try again.
Page
9