


Positioning your projector 15
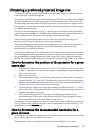
Obtaining a preferred projected image size
The distance from the projector lens to the screen, the zoom setting, and the video format
each factors in the projected image size.
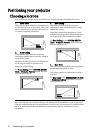
The projector should always be placed horizontally level (like flat on a table), and positioned
directly perpendicular (90° right-angle square) to the horizontal center of the screen. This
prevents image distortion caused by angled projections (or projecting onto angled surfaces).
If the projector is mounted on a ceiling, it must be mounted upside-down so that it projects
at a slightly downward angle.
You can see from the diagrams on page 17, that this type of projection causes the bottom
edge of the projected image to be vertically offset from the horizontal plane of the projector.
When ceiling mounted, this refers to the top edge of the projected image.
If the projector is positioned further away from the screen, the projected image size
increases, and the vertical offset also increases proportionately.
When determining the position of the screen and projector, you will need to account for
both the projected image size and the vertical offset dimension, which are directly
proportional to the projection distance.
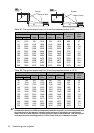
BenQ has provided tables of 16:9-aspect-ratio and 4:3-aspect-ratio screen sizes to assist you
in determining the ideal location for your projector. There are two dimensions to consider,
the perpendicular horizontal distance from the center of the screen (projection distance),
and the vertical offset height of the projector from the horizontal edge of the screen (offset).
How to determine the position of the projector for a given
screen size
1. Determine the aspect ratio of your screen, 16:9 or 4:3? If you have a 16:9 screen, refer
to page 17. If you have a 4:3 screen, refer to page 18 depending on the projected picture
aspect ratio you’ve got.
2. Select your screen size.
3. Refer to the table on page 17 and find the closest match to your screen size in the left
columns labelled "(a) Screen size". Using this value, look across this row to the right to
find the corresponding average distance from screen value in the column labelled "(b)
Distance from screen". This is the projection distance.
4. On that same row, look across to the right column and make note of the "(c) Vertical
offset" value. This will determine the final vertical offset placement of the projector in
relation to the edge of the screen.
5. The recommended position for the projector is aligned perpendicular to the
horizontal center of the screen, at the distance from the screen determined in step 3
above, and offset by the value determined in step 4 above.
For example, if you are using an 120-inch, 4:3-aspect-ratio screen and the projected picture
is 16:10, please refer to Table B2
on page 18, the recommended projection distance is 1192
mm and the vertical offset is 76 mm.
How to determine the recommended screen size for a
given distance
This method can be used for situations where you have purchased this projector and would
like to know what screen size will fit in your room.
The maximum screen size is limited by the physical space available in your room.