


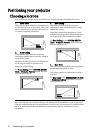

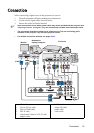


Connection22
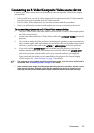
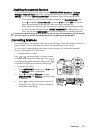
Connecting a DVI-D device
You should use a DVI-D cable when making connection between the projector and DVI-D
device.
To connect the projector to a DVI-D device:
1. Take a DVI-D cable and connect one end to the DVI-D output port of the video
device.
2. Connect the other end of the cable to the DVI-D input port on the projector.
3. If you wish to make use of the projector (mixed mono) speakers in your presentations,
take a suitable audio cable and connect one end of the cable to the audio output jack of
the device, and the other end to the AUDIO or AUDIO (L/R) jack of the projector.
4. If you wish and the AUDIO OUT jack is available on your projector, you can use
another suitable audio cable and connect one end of the cable to the AUDIO OUT
jack of the projector, and the other end to your external speakers (not supplied).
Once connected, the audio can be controlled by the projector On-Screen Display
(OSD) menus. See "Audio Settings" on page 51 for details.
• The projector is only capable of playing mixed mono audio, even if a stereo audio input is
connected. See "Connecting audio" on page 21 for details.
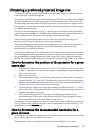
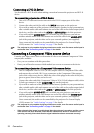
Connecting a Component Video source device
Examine your video source device to determine if it has a set of unused Component Video
output jacks available:
• If so, you can continue with this procedure.
• If not, you will need to reassess which method you can use to connect to the device.
To connect the projector to a Component Video source device:
1. Take a Component Video to VGA (D-Sub) adapter cable or Component Video cable
and connect the end with 3 RCA type connectors to the Component Video output
jacks of the video source device. Match the color of the plugs to the color of the jacks;
green to green, blue to blue, and red to red.
2. Connect the other end of the Component Video to VGA (D-Sub) adapter cable (with a
D-Sub type connector) to the COMPUTER jack on the projector.
3. If you wish to make use of the projector (mixed mono) speakers in your presentations,
take a suitable audio cable and connect one end of the cable to the audio output jack of
the device, and the other end to the AUDIO or AUDIO (L/R) jack of the projector.
4. If you wish and the AUDIO OUT jack is available on your projector, you can use
another suitable audio cable and connect one end of the cable to the AUDIO OUT
jack of the projector, and the other end to your external speakers (not supplied).
Once connected, the audio can be controlled by the projector On-Screen Display
(OSD) menus. See "Audio Settings" on page 51 for details.
• The projector is only capable of playing mixed mono audio, even if a stereo audio input is
connected. See "Connecting audio" on page 21 for details.
• If the selected video image is not displayed after the projector is turned on and the correct
video source has been selected, check that the video source device is turned on and
operating correctly. Also check that the signal cables have been connected correctly.